Showing posts with label 2013 finished. Show all posts

Monday, 10 March 2014

From A - Sewing with Leather

Working with leather is one of those things that I have desperately wanted to learn more about. I love the idea of making bags with leather accents and small wallets and change purses as gifts for friends. There is something about a few pieces of leather that make the finished product seem so much more "professional".

Leather Clutch

While back in Toronto over the holidays, I signed up for a quick leather clutch class at the Workroom. In addition to being a welcome break from the intensity of a holiday with the in-laws, it was nice to spend some time back in my old stomping grounds.

Leather Clutch

Sewing with leather was much simpler than I thought it would be. After a few short hours, I had a super cute metallic leather clutch, lined with some paisley Liberty Tana Lawn, of course!

Leather Clutch Lining

Have I mentioned my obsession with plaids and paisleys. I'll buy almost any fabric if it has paisleys or plaid (in fact, I bought two yards of this lining print when a 1/4 yard would have been more than enough). Ask Kelsey, she's talked me off the ledge more than a few times.

Leather Clutch

The leather I used for this clutch was paper thin so I ended up interfacing it to give the bag a little more body. The finished bag is professional looking and decadently elegant (I am especially taken with the little pleat).

This project has me hooked!! I've already found my next leather work class. Perfect timing since I'll have to make something with leather for our next traditional anniversary gift.

Friday, 31 January 2014

From K - Skills Swap: Knit Socks for Adrianne (On the Windy Side)

Last week I shared the incredible handmade items that Adrianne from On the Windy Side sent me for our for our skills swap. This week I wanted to show you how it all began - with a pair of hand knit socks.

In August of last year Adrianne posted about wanting a pair of hand knit socks. Since I learned to knit just five months earlier (and socks were really my only accomplishments to date), I put up my hand right away to participate in a swap knowing socks were right up my alley.

I largely followed the Nutkin pattern on Ravelry but made quite a few alterations. One prominent change involved making a new cuff as the original cuff style didn't cling nicely to my leg when I tried it in. I had knit most of the first leg when I realized the cuff from the pattern was going to make for baggy socks, and really, who wants that?! I ripped it out and recast on using K2P1 for about 12 or so rows.

I also struggled a bit with the directions for the short row heel that the pattern includes so I simply turned to my dear friend YouTube to show me the way. I have never made a heel without a gusset and I have to say I actually kind of missed doing it. I do like the look of this heel though and I think that it does fit well with the overall sock design.

I knit these up using a gorgeous superwash Malabrigo sock yarn that I picked up from my LYS in the colour Dewberry. I didn't tell Adrianne what pattern I was knitting so there would be some surprise, but I did ask her for some colour examples. She largely sent photos of tone on tone skeins so I thought this purple would be perfect. The slight variegation in this yarn makes them look sparkly and I love the texture it adds.

I snapped these pictures quickly at work on my iPhone before I tossed these into a box filled with other sewing notion, fabric, washi tape, a Christmas ornament and a few Canadian treats. In my haste I didn't photograph the rest, but as the purpose of the swap started with a desire for knit socks, I'm hoping these photos suffice.

Tuesday, 21 January 2014

From A - Handmade Holiday

Sometime around December 5th, I became consumed with the idea that I would make handmade Christmas gifts for almost everyone I knew. I figured in the 20 days that were left before the big day, I could weave 7 scarves, tat half a dozen snowflakes, knit some hats, finish four quilts, make 3 baby gifts, and a tree skirt.

You can probably guess how that turned out.

Weaving

The first scarf is still on the loom and only half finished. the other 6 still look like this.

Yarn

After a false start, the first tatted snowflake doesn't look much like a snowflake.

Tatting

That said, I did manage to finish the three hats and by finish I mean that they were still damp from blocking when I wrapped them up. A Jul hat for my sister-in-law (actually a much deeper shade of purple), a silk-lined New York Skyline hat for my brother-in-law (didn't get a finished shot of this one), and a Hurricane hat in Malabrigo for my mom.

Christmas Hats

To my great relief, the Posy quilt re-do is finally finished and has been gifted to its itty-bitty recipient. Sorry for the crappy photo but it is identical to the first version except that this one washed and crinkled like a champ using Warm and White batting instead of turning itself into a floor mat like the last one.

Camera Roll-1051

Sticking to my shop the stash mantra, I also pulled some fabric for another flannel voile baby blanket. I used a yard of Valorie Wells flannel in Marrakech and a yard of Amy Butler voile in Peacock Feathers. The blanket satin binding is from Fabricland. I can say that having a walking foot to attach the blanket satin made a big difference.

There are at least four more of these to come as I brace myself for the second round of friend babies scheduled to arrive later this year.

Baby Blanket

I also finished the top half a tree skirt using the Tinsel Treeskirt pattern from Issue 11 of Fat Quarterly using only stash at about 3:00 a.m. two days before Christmas. Shortly thereafter, I realized there was no way that I was going to enjoy Christmas and get this finished so it's heading into the long-term planning box for next year.

If you are going to attempt this one, be warned that the cutting instructions for the center panel are off by 1/2". I was too tired to notice until the pieces wouldn't fit together. Fortunately, my commitment to quilting perfection is pretty dull at 3:00 a.m. and I managed to fudge things enough to make it work.

Tree Skirt

Partial success and a head-start for next year. I'll take it!

Tuesday, 14 January 2014

From A & K - A Year in Review

It's been a busy year for both of us. Kelsey got a fancy promotion a work (which came with a correspondingly insane work schedule). Amanda moved to California and went back to school.

It's also been a good year for both of us. Somehow amidst the chaos, we've also managed to see more of each other than ever before and even snuck in a few amazing trips together (NYC, SLC, Seattle)!

Kelsey got bit by the knitting bug and her needles have been turning out gorgeous project after gorgeous project ever since.
2013 Knits
1. Snowfling Mitts  2. Hedgerow Socks  3. Licorice Twist Cowl   4. Honey Cowl
5. Medallion Lace Socks 6. Hermione's Everyday Socks
We made clothes
2013 Garments
1. Sleeveless Tova  2. Panda PJs  3. Stampede Washi  4. Eucalypt Tank  5. Liberty Tie  6. Liberty Staple
7. Floral Washi  8.  Nani Iro Shearwater  9. Shearwater Kaftan 10. Seattle Staple  11. Sloppy Josephine
Bags and accessories

2013 Accessories
1. Bikini Pouch  2. Simple Satchel  3. Lap Duvet  4. Nani Iro Scarf  5. Travel Hoop Bag
6. Open Wide Pouch  7. Clutch  8. Duffle  9. Make-Up Brush Roll

and of course, quilts!!
2013 Quilts
1. Sew Positive Baby Quilt  2. Wonky Stars  3. Mermaid Quilt  4. Manly Plus Quilt  5. Salt Water Swoon
  6. Posy Quilt  7. Moving Walkways  8. Smitten  9. Kites Quilt
A pretty productive year overall. We have big plans for next year: lots of new quilts, clothes and Amanda is even planning to unearth some old WIPs, dust them off and wrap them up. Stay tuned!!

Wednesday, 1 January 2014

From K - Finished Mermaid Triangle Quilt

In 2013 I learned two important things about my crafty nature. The first being that I never start a project without intending to learn at least one new skill set, trick of the trade, or perhaps more importantly, insight into myself. And the second, is that 'random' absolutely does not come easy to me.
Kelsey's Mermaid Triangle Quilt
This quilt reinforced this by providing me with tons of new opportunities to learn - piecing triangles, matching points while seaming, and well, the whole random issue. I call 'random' an issue not because it's a problem, but because while making this quilt I learned that I need to push myself to just let go more often... or at least sometimes... or even just once as a start.
Kelsey's Mermaid Triangle Quilt
I admit that while making this quilt I struggled a lot with just trying to be random. In the end I settled on two guidelines to help me maintain a wee bit of structure. First that I did not want to place the same print side-by-side (because let's face it, I think we'd all struggle with that), and second, after much deliberation I did consult my Ruby Beholder (because people, sometimes value overrules random placement).
Kelsey's Mermaid Triangle Quilt
I finished up this quilt in the wee hours of Christmas Eve morning. Just in time to photograph, wash, and wrap it so that it was ready for Christmas morning.
Kelsey's Mermaid Triangle Quilt
It's now at home with its new family. The super sweet and adorable recipient is my 3 month old niece. I'm keeping my fingers crossed that she grows up to love mermaids because I am a wee bit obsessed with the Sarah Jane print I used for the backing from Out to Sea

Kelsey's Mermaid Triangle Quilt

Final Quilt Details:
  • Quilt Name: Mermaid Triangle Quilt
  • Finished Size: lap sized (67" x 76")
  • Fabric: total hodgepodge of semi-solid prints from my stash to match the feature print (AMH's Sundials in Amethyst); Sarah Jane's Mermaid Play in Breeze (backing fabric)
  • Pattern: Sewing Summit class taught by Jeni Baker from In Color Order
  • Quilting: FMQ swirls in the background and a FWQ feature flower in the purple hexagon
Kelsey's Mermaid Triangle Quilt 
To learn more about the making of this quilt, go here and here. This is my forth completed project for the Q4 2013 Finish A-Long - read more about my other goals here.

Tuesday, 17 December 2013

From A - Simple Satchel

Finally recovered from a few harrowing weeks of exams and the flu, it is time to show you a recent finish before I throw myself back into Christmas gift sewing.

Just over a week ago, in a flurry of exam stress, I dug out a project that I cut out back in August for a quick study break. A couple of relaxing hours later, I had a finished bag made using Guy Latulippe's killer Simple Satchel pattern in the small size. I really love Guy's patterns. This is my second (my duffle being the first). They are simple to make but you're left with a finished product that could easily be passed off as something you bought in a chic boutique.

Simple Satchel 

I used a gorgeous navy herringbone print that I bought when Kelsey and I were in Seattle together for the bag exterior. It's home dec weight which makes it perfect for a nice and sturdy satchel. Some of the leftover Indian Summer fabric from my Eucalypt tank was a perfect match for the lining.

Simple Satchel

I ended up adding some lightweight interfacing to the bag to give it a little more structure but otherwise, followed the pattern exactly. The pattern was great and although my sleep deprived quilter's brain couldn't process the three dimensional bag instructions when I first read through them, they were crystal clear when I actually started sewing.

Simple Satchel

I am beyond tickled at how well the exterior print lined up across the seams. I made a half-hearted attempt to fussy cut as I was going along but this level of accuracy is the product of sheer luck.

Simple Satchel 

This bag is a perfect size, it will comfortably hold an iPad or a book, a wallet, keys and some lip balm. The ADJUSTABLE cross body strap makes it the ideal thing to use when I'm running errands on my bike. This was my first time using bag hardware and it really adds a nice touch. I bought mine from a wholesaler called UMX after I couldn't find anything big enough locally. I bought enough hardware for three bags when I ordered so you can bet that there will be more of these in my future.

Friday, 6 December 2013

From K - Finished Manly Plus Quilt

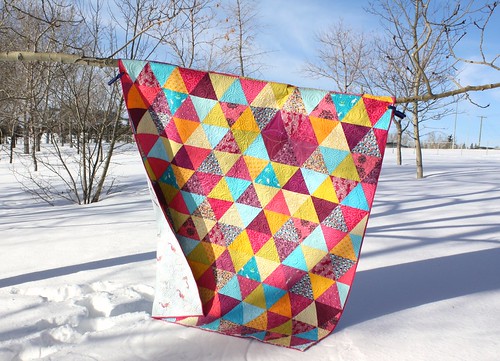
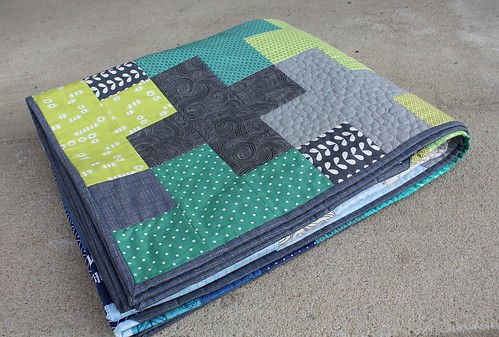
Have you ever had a quilt transpire in your mind with such a presence that you just couldn't shake it until it became a reality? That's what this quilt was to me. I tiny compliment from my husband on my Pink Pluses Quilt was all I needed to dream up this manly plus version for him to keep.
 
Manly Plus Quilt
For someone who is extremely supportive of my 'more often than not' all consuming hobby, I have yet to thank him with a quilt of his own. He has never nagged for one but I know he feels a bit slighted every time I show him a finished quilt and he says "wow! That one's great, do we get to keep it?!"... and then the answer is always "no".... *insert wife hanging her head in shame here*
 
I know what you're thinking - just give the man a quilt already Kelsey! And so I will.
 
Manly Plus Quilt
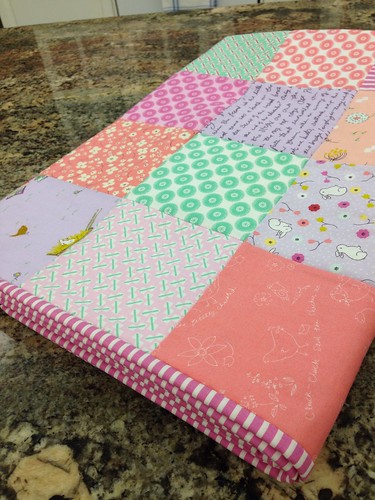
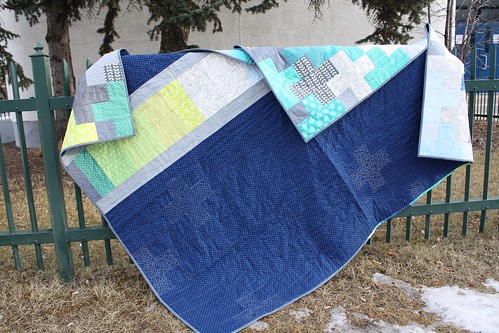
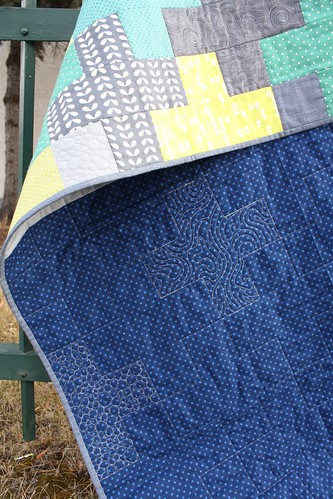
I wanted the backing to be timeless, simply, and obviously a bit manly. Using fabrics from the quilt top, I laid out varying widths of remnants in a strip to play up the gradient from the front.

 
I didn't want this quilt to be stiff, so I went with a combination of straight line quilting around each plus shape and then added some dense FMQ in a few feature pluses.
 
Manly Plus Quilt
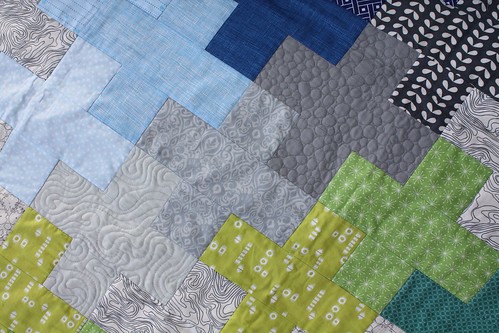
Most of the prints in this top are patterned which adds a fair amount of texture. Two solid fabrics however stuck out, so I decided they needed a bit more attention.
 
The dark gray solid pluses received pebbling while the light gray pluses received a somewhat topographic design. I love that these designs are both inspired by natural elements and that they compliment the Architexture prints in the top.

Manly Plus Quilt
I also absolutely adore the texture that the randomly quilted pluses add to the quilt back. Happy surprises are the best surprises after all.
 
Final Quilt Details:

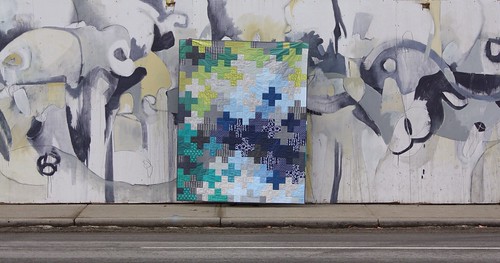
  • Quilt Name: Manly Plus Quilt
  • Finished Size: large lap sized (54" x 75")
  • Fabric: various prints from my stash
  • Pattern: I didn't follow a pattern. I just laid out rows using one 3.5"x9.5" and two 3.5" squares for each plus.
  • Quilting: quilted on my Janome 8200. Straight line quilting to outline each plus block, supplemented by FMQ pebbling and topographic lines in feature pluses.
 
I started quilting more than three years ago and I have never snuggled with a quilt that I've made, I don't even own a quilt myself (shameful I know). I'm feeling a bit selfish that I can't wait to gift this - not only because I can't wait to see his face, but also because it will undoubtedly be followed with a good ol' fashion couch snuggle fest. Pass the popcorn please!
 
Read more about this quilt top here. This is my third completed project for the Q4 2013 Finish A-Long - read more about my other goals here.
 
 Linking up to Needle and Thread Thursday and Finish it up Friday.


Sunday, 1 December 2013

From K - Snowfling Mitts

Two months ago, when autumn was quickly fading into winter, I cast on a pair of mitts for the very first time (first successful time that is). The combination of a long roadtrip, a work trip, and a few furious knit nights, made for some seriously speeding knitting, and after two weeks I had my very own pair of Tanis Fiber Arts Snowfling Mitts.

Kelsey's Mits

To be honest I have been dying to make mittens to a long time but flashbacks of the Christmas mitten fiasco of 2002 kept flashing in my head, and I didn't think I could stomach the idea of another pair of mitts being stashed away, thumbless and forever to be unloved. **For reference - Amanda was convinced she would teach me to knit more than a decade ago and I had a paralyzingly fear of knitting thumbs (a fear that I only now just concurred).


Kelsey's Mits

This was my first real foray into colour work and I was surprised by how easy it. To be fair though my ability to pick it up quickly might have been helped tremendously by the pure fact that I cast these babies on after Thanksgiving supper with Amanda in close range.


Kelsey's Mits

These beauties have a cashmere lining that add the perfect touch of added warmth and luxury. I can officially say I'm hooked and another kit is in the mail. The more mitts the merrier!


Wednesday, 20 November 2013

From K - 16 Recent Finishes

Back in July I wrote a post where I mentioned an extremely over-ambitious goal that I set as a means of keeping myself focused and on track. My plan was to complete 15 Project in 15 Weeks between the dates of July 13th and October 25th. As my current WiPs are starting to pile up around me again and I'm feeling a tad bit overwhelmed, I figured it was high time that I reflect on what I accomplished during that time to help motivate me to keep on keepin' on. 

Until I actually sat down to write this post, I had no idea if I had met my target or not... and as it turns out I not only met my goal, but I evidently surpassed it by finishing 16 projects in 16 weeks. Wha?! *brushes off shoulder* All jokes aside though, I think it's good for us all to sit back sometimes and reflect on how far we've come and what we learned along the way - a task that I know many of us don't often do.
With that in mind, here are my 16 finishes:

Bags:
I adore making bags and was surprised to see that when looking back, I developed new skill sets with each bag I made. I learned how to glue on a metal frame, how to QAYG and how to sew with both strapping and duck canvas!
Mosaic of Bags
From Left to Right: Metal Frame Clutch, QAYG Pouch and Duffle Bag

Quilts:
In total I made four quilt: two baby quilts, a throw and a queen sized quilt (my biggest finish to date).
Mosaic of Quilts
Clockwise from Top Left:

Amanda and I also collaborated on a special lap quilt for our great aunt's 90th birthday during this time frame.
Wonky Star Quilt

Garments:
Over the past 16 months I also learned a ton about garment sewing. It was my first time sewing with both piping and voile.
Mosaic of Garmentss
Clockwise from Top Left:

Knits:
I have been knitting up a storm as of late, completing two cowls, a headband and a pair of socks. I might also have 4 more projects cast on already... but that's for another day.
Mosaic of Knits
Clockwise from Top Left:

Sometimes I find it considerably too easy to get caught up in my WiP list and gifting deadlines. Today I'm taking the time to celebrate my wins and look back at what I've learned in the process. I'm feeling pretty energized now to make some headway on my current WiPs: a manly Christmas quilt, a late baby quilt, a Christmas quilt and a beloved sentimental quilt that needs some finishing up.

Reflection was the perfect remedy for me today to get back at my machine. What do you do when you need to rev up your quilting mojo?

Monday, 18 November 2013

From A - Liberty Lap Duvet

It's starting to get chilly here at night and as a result, the Mr. and I have started fighting over the giant grey blob of a down comforter that occupies our couch. Wanting something a little more attractive that would offer warmth and restore marital harmony, I decided to make a Liberty and wool lap duvet.

Liberty Wool Lap Duvet

This is Liberty's Mauvey print. Definitely my all-time favourite! I just can't get enough of the combination of flowers and stars. I think I have it in three different colourways at this point.

Liberty Wool Lap Duvet

I used the satin stitch on my machine to "quilt" it all together with some yellow Aurifil thread I had from this project. Finished dimensions are about 32" by 54" which makes it the perfect size to snuggle up with in my favourite armchair.

Liberty Wool Lap Duvet

Although I was a little skeptical at how warm a thin layer of Liberty tana lawn and some felted wool would actually be, I was pleasantly surprised when I took this baby on a test drive last night while watching the boob tube with my blanket hog spouse. With this baby in hand, I can probably hold off turning on the heat for another month or two.

Sunday, 17 November 2013

From A - Sloppy Josephine Tee

My general clothing philosophy is comfortable, casual and fuss-free. This basically means that I live in knits. Knit tops, dresses, pants. You  name it, I probably own it in a knit. Since I would much rather shop for fabric than shop for clothes and needing an excuse to play with my new machines, I whipped up a new t-shirt this weekend.

Sloppy Josephine Tee

This is the Sloppy Josephine Tee by Papercut Patterns which I bought a few months back when my lust for knits and sergers blossomed into a full blown obsession.

I used some burnout jersey knit star fabric that I bought with Kelsey when we were in Seattle. It's a rayon/cotton blend jersey that is super duper soft and downright snuggly.

Sloppy Josephine Tee 

This top went from fabric to finished in only a few short hours. The pattern was pretty straightforward if a bit light on instructions. I didn't alter it at all except to add some top stitching to the neckline. I'll likely shorten the neckband a bit on the next one so that it holds everything in a little more but otherwise this is pretty much exactly what I was looking for.

Sloppy Josephine Hem

And the new coverstitch machine? Genius. The hem was finished cleanly and professionally in about 15 minutes. It was so easy and painless that it might even have been my favourite part of the whole process.

Sloppy Josephine Tee

The finished result is extremely comfortable and dare I say, stylish. So cool in fact that even this little guy decided to fly in for a closer look (and probably some breakfast) while we were out taking photos.

Humming Bird

Happy weekend friends. What did you make?