Friday 29 June 2012

From K - Mastering the iPad cover

As summer ramps up I've been finding it increasingly more difficult to find free time for myself. This week was especially busy, and the very limited free time I did manage to find looked a little something like this:


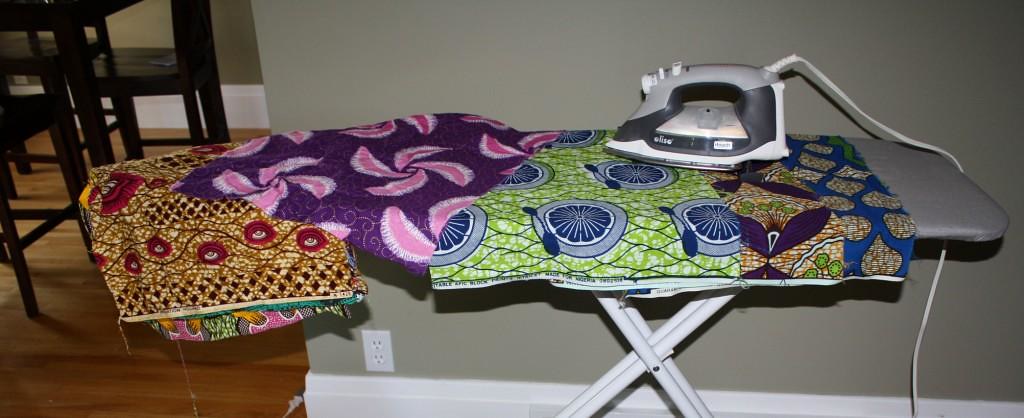
I've spent nearly 15 hours this week washing, ironing and cutting wax print scraps for the two Ghanaian quilts I have planned. Needless to say, my living room looks like a hurricane of fabric hit it, and I'm biting at the bit to set up my new craft space. Big plans are in motion right now on that project (including the recent purchase of a convertible sofa!) and I'm hoping to be moved in within the next few weeks.

In the meantime I am fortunate to be spending the next five days at our cabin, and I've already found some down time to sew a small project.


On my Summer Sewing Hit List post I mentioned that I planned to make my sister-in-law an iPad cover. Today I spent my afternoon putting the finishing touches on her new case and I love the way it turned out. I followed this great tutorial by One Shabby Chick and then tweaked a couple things to customize it a bit.

Altogether there were three main edits that I made to the original pattern. I had the perfect green flanelette in my stash so I decided to line the inside of both my own case, as well as my sister-in-laws case with it.

I also decided early on in my planning process that I wanted to incorporate some applique into these projects. The photo below gives you a little glimps at the double applique technique that I used to highlight a little owl from this adorable Alexander Henry fabric. Keep your eyes peeled for a tutorial on this technique soon.


Lastly I decided that I wanted a full width fold-over flap rather than the narrow one that is shown in the pattern. To accomplish this I began by cutting my flap pieces to 8 x 4.5 inches and then rounded two of the corners on each piece using my rotary cutter and a coffee mug as a guide. Once the pieces were sewn together all that was left to do was add some notches around the corners (as shown below). I then simply turned the flap right-side out and continued along with the remaining directions.


Happy Canada Day to all my fellow Canadians and have an enjoyable long weekend. I  know that inbetween fireworks and bbqs I will be sneaking in another small projects or two, will you?

Wednesday 27 June 2012

From A - 'Tis the Season to make Hexies

There's nothing quite like a Canadian winter to make me downright giddy at the prospect of a few months of sunshine, grass and flip flops.

As summer barrels towards me, I find myself spending more time in parks, on patios and generally anywhere that is not within reaching distance of a sewing machine.

What's a crafty girl to do? Handwork!


Lately, more and more of my big sewing projects are being sidelined in favour of some good old English paper piecing. Let me tell you, making those hexagons is very, very addictive!


While I methodically cut, baste, and sew the little units together, I can't help but admire their perfect finished edges and their beautifully symmetrical shape.


I'm not sure what these little hexies will become but I can tell you that it's very likely that I'll spend most of my summer making more of them.


What are you working on this summer?

(PS. Fat Quarterly is hosting a quilt along to make a whole quilt worth of hexies. Although the finished quilt is absolutely gorgeous, there is no way the Toronto heat and sun will last long enough for me to get that kind of project started, let alone finished. You'll find me cheering the brave participants on from the sidelines as I add to my collection of green and blue hexagons.)

Monday 25 June 2012

From K - Craft Room Inspiration Board

One of the prominant action items that I mentioned in my Summer Sewing Hit List was to modify an existing space in my house that would allow my creative juices to flow. Our current guest room serves well for its intended function, but when it's not in use, it makes for a lot of wasted space. While talking it over with the hubs, we decided that the guest room might as well serve a dual purpose.

In order to visualize what mood I wanted for this space, I went to work putting together some inspirational photos using OlioBoard, and this is what I came up with:


When planning this change, I had a couple of main objectives in mind:

1. Don't spend a fortune. I want to create a more functional space, but not at the risk of a costly reno. I want to set out to find some practical and affordable pieces, and also to use what I already have available to me.

2. Start with a clean slate. Presently our guest room is a pretty vibrant purple. The room was originally painted a couple of days before guests started arriving for our wedding, and while the colour wasn't how we invisioned it, we somehow left it until now. I'm thinking a clean grey would be a good place to start.

3. Don't forget about guests. Although we presently don't host guests more than once every month or two, I still want to make sure they have an enjoyable stay, and that includes a private space of their own, a soft spot to sleep, and a warm rug under their toes. I plan to accomplish this using a convertible sofa and a practical but inexpensive ikea rug.

4. Incorporate inspiring elements. (in progress, and finished!) My hope for this room is that my Works in Progress will be what catches the eye, so I'm keeping the furniture very neutral. With that being said I wouldn't do myelf any favours though if I didn't at least incorporate a few of my favourite Anne Marie Horner prints from Innocent Crush. I think they will wip up to become some excellent custom pillows.

5. Create storage to maximize space. About 4 months ago after endlessly searching for a storage solution, I broke down and purchased a Pax Wardrobe System and filled it up with drawers of crafty good-ness. This unit has been an absolute blessing the way of managing my quilting stash and other craft supplies, but I want to make sure I also incorporate some useful storage that isn't necessarily hidden behind closed doors.

6. Make quilting a priority. (finished!) In order to truly maximize my use of this new space, I need to put sewing on the front burner. This means dedicating space for a cutting board, an ironing station, and of course my trusty sewing machine.

7.* Build a dedicated design wall. Part of making a sewing space is to minimize the fabric explosion that presently exists around the rest of our house. Gone will be the days when my couch stood in the place of a design wall. I'm hoping the hubs will help me build something pretty nifty so the couch can be fabric free (*not shown on mood board above).

I'm hoping to make this design process a priority over the next couple of weeks in order to encourage myself to complete the rest of my summer sewing list. I'll be sure to keep you posted on my progress!

Saturday 23 June 2012

From K - Summer sewing motivation

Every fall I develop an intense desire to sew, and that feeling follows me well into winter. But by summer something changes, and I find myself procrastinating projects, packing away my Janome, and as a result deferring an activity that brings me so much joy.

This year I'm determined to keep up my creative streak and to keep me focused I've made a list. I read once that people who write down and share their goals are 10x more likely to complete them than those who don't - so here's me giving it a shot!

Summer Sewing Hit List:

1. Complete two wax print quilts:
(sneak peek here and here) I spent a summer in Ghana a few years back and have yearned for a wax print quilt ever since. I recently bribed a friend who lived there to bring me back some tailor's remnants and she took the bait! Now I have a pile full of scraps and a plan to make us each a beautiful memento of our time there. Unfortunately getting it all washed and ironed seems to be holding me back right now.

2. Sew up an iPad cover for my sister-in-law:
(finished!) I recently made myself a custom iPad cover and my sister-in-law swooned. She did her part and picked out some fabrics, so now I need to follow through and deliver a product.


3. Sew something at isn't straight:
(finished!) I loooove clean straight lines and nothing makes me happier than chain piecing a quilt top, but last year when Amanda was married she made each of her bridesmaids a custom Amy Butler Birdie Sling Bag and I've been smitten with mine ever since. It's about time I sew myself another!


4. Create a craft room:
(design board and reveal coming soon!) This hit list item is what I'm hoping will really motivate me this summer. I'm determined to make some affordable changes to our current guest room so it can serve dual purpose as sewing space and extra bedroom. I plan to elaborate more on this in an upcoming post so keep my eyes peeled for that!


5. Sew a futon cover fit for a creative sewing space:
In order to make space for my Janome, a cutting table, and the odd guest, the rock hard queen sized bed has got to go. A futon will have to take its place, and I intend to cover the dull fabric it comes with, using a print that inspires. (*update: we bought a convertible sofa so a futon cover wasn't necessary. I've since changed this to-do item to "make new curtains" - reveal coming soon)

6. Whip up some decorative pillows for the new craft room:
(while in progress and now finished!) No craft room couch is complete without a couple of vibrant pops of color in pillow format.

7. Make a custom cushion for a pint sized rocking chair: My father-in-law is a gifted crafter in his own right and recently made a darling child sized willow rocker for the cabin. I order some fabulous owl fabric and plan to whip up a pint sized cushion to match.

8. Stock up on baby gifts: (burp cloths) There is no shortage of new baby mamas this year, and this go around, I intend to stock up on my shower gifts before the 11th hour.


What projects are you determined to work on this summer?


Friday 22 June 2012

From A - Best Intentions

I received a DIY envelop template kit and an envelop lining template kit for Christmas last year from my husband.

As someone who loves sending mail and hates buying pre-fab cards, I was absolutely thrilled at his thoughtfulness and promptly decided I would make handmade cards for everyone I knew this year.

Considering that it is now June and that I've only made two cards, you can safely assume how that went. Never one to give up, I decided to dust off the card making supplies in honour of a dear friend's birthday.

I started with a piece of scrapbook paper and made an envelop.


I also purchased a custom address stamp for the back flap. Love it. It gives the cards such a manicured finish. I got mine here but I am sure they are readily available.


I used a carpet ad from an old home decorating magazine for the lining and found the perfect piece of scrapbook paper for the card proper.


Another piece of lovely scrapbook paper for the inside and some hand-cut sparkly felt numbers, cut using numbers I printed from Word as templates.


And I had the perfect card in no time flat! I forgot how much I love making cards. It's fairly simple and ever so satisfying, a winning combination in my books.

Wednesday 20 June 2012

From A - Swoon-ing along

I managed to finish up a few more Swoon quilt blocks last night while snacking on these.


I've been sewing my Swoon blocks production line style in batches. My trusty kitchen counter was a huge help. Here are five blocks worth of half square triangles ready for action.


And the designated Swoon block assembly area in the spare bedroom (with a little preview of blocks to come).


If you're thinking of making this quilt, I would strongly recommend that you make all of your individual pieces, organize them into blocks, lay them all out in block form and then just start chain piecing until you can't stand it anymore.

I would also suggest that you substitute the flying geese construction method set out in the pattern instructions with the one found here. You'll have to modify the cutting instructions a bit but it saves time and oodles of fabric.

Without further ado, I give you blocks 2, 3, 4, and 5. Individual photos of the blocks can be found on our flickr stream.


I decided to add a little shot of green in Block 4 to emphasize the soft green in my colour scheme. I was also worried that the butterfly fabric would blend in with my background fabric. I'm glad I did. I think it really makes the block pop.


Now only 4 more to go!

Tuesday 19 June 2012

From A - Inspiration to Reality: A Swoon Quilt

I am a process crafter. Most of the time, I don't care whether a project ever gets finished. I make things because I want to try a new technique, see how something will come together, or just blow off some creative steam.

Because of this, I love learning about other people's creative process. How did they choose materials? What inspired them? What inspired the colour scheme? Since there must be others out there like me, I thought it wise to contribute to the "process" conversation by documenting my own.

After seeing countless renditions of Camille Roskelley's popular Swoon pattern, I decided that it was time to jump on the band wagon and give it a whirl figuring that my guest bedroom could use a nice quilt to spruce up the otherwise sparse decor.

Struggling with fabric choices, I turned to Design Seeds a.k.a. my absolute favourite source of colour inspiration and found this little gem.


I love the differing shades of purple from the softest lilac to the deepest plum set off against the cream with hints of grey and dusty green with just a hint of turquoise.

Then I found this quilt and fell totally in love with movement and sense of chaos created by using geometric prints in the outer star portion of each block.

I settled on these fabrics:


Yesterday I managed to finish my very first block. I am blown away by how much the relationship between the fabrics changed as they were cut and pieced together. Two fabrics that appeared to be relatively high contrast to me in fat quarter form really blended together when pieced. I really had to be careful with the positioning of the outer spokes of the star to try and maintain enough contrast.


Here's a better shot of the spokes.


Only 8 more to go!


Monday 18 June 2012

From K - For the baby who has everything

Last week Amanda posted about what I like to term "baby boom 2.0". There's no doubt in my mind that generation 'Y' is giving it their best shot at a modern day baby boom, and struggling to find the perfect gift at every shower can be quite the chore.

As an avid hobbyist in all things crafty, I can't resist the opportunity to gift something personal and homemade for any special occasion. With all of the baby showers I've attended over the past few years though I've often struggled to find that perfect gift that a new family or a family on their second child might find unique.

About 8 months ago a stumbled across a couple of blogs that framed paper punch hearts and butterflies. Unfortunately when my computer died a couple months back I lost all of my saved links so I can't share my original inspiration (if only I had been on pinterest back then!), but here is my interpretation of a unique gift for that baby with everything.

Framed Sheep - Nursery Artwork Tutorial


This is the perfect mid-week, last minute, relaxing craft that can be pulled together in 1.5-2 hours.

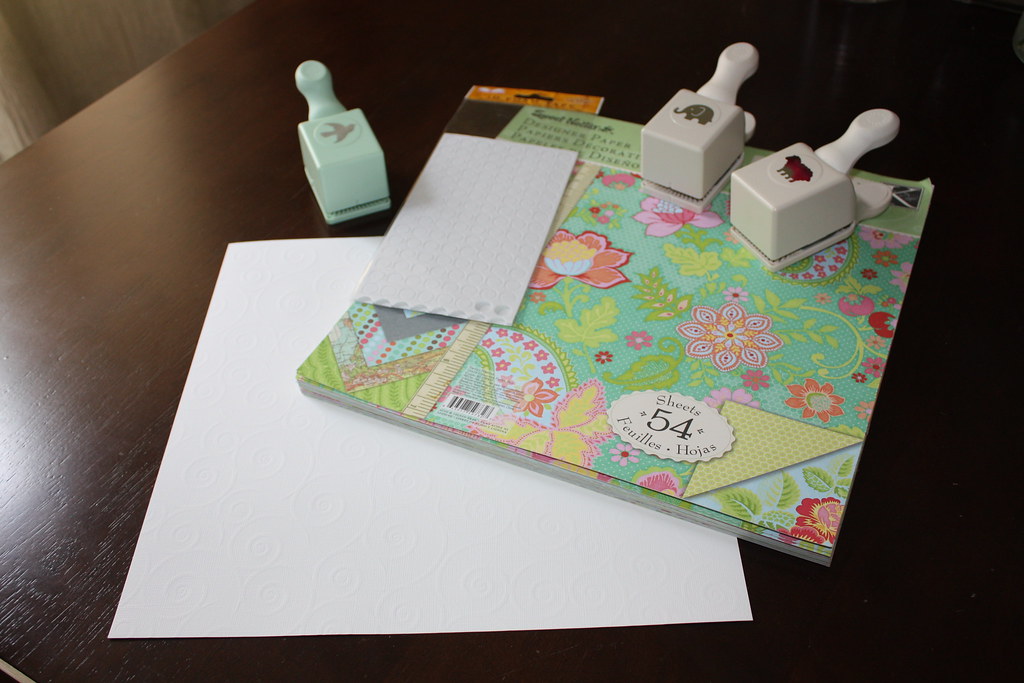
Supplies used for this craft include:
  • A frame with a double mat;
  • Scrapbook paper of your choice;
  • 3D Foam Adhesive Dots (adhesive on both sides);
  • A sheep shaped paper punch (or any other shape you wish); and
  • A great pre-taped show on your PVR to keep you entertained.

When choosing material, think of the nursery it will hang in and feel free to experiment! If I'm not sure what the decor plans are, I tend to use a simple textured neutral background scrapbook paper and then use colourful animal shapes, hearts, or fleur-de-lis on top. Remember though that this craft is all about tailoring it to the recipient and the more creative the better! I once used newspaper print from the day of birth as the background with red hearts placed on top - the sky is the limit so think outside the box.

To start off, begin by punching sheep shapes from your selected paper and tentatively lay them out on your background material. Without adhering anything yet, lay the double mat on top of the background material and ensure the placements of sheep look level. I like the good ol' eye ball level but if you are worried about spacing things perfectly feel free to mark dots on your background paper using a ruler as your guide.


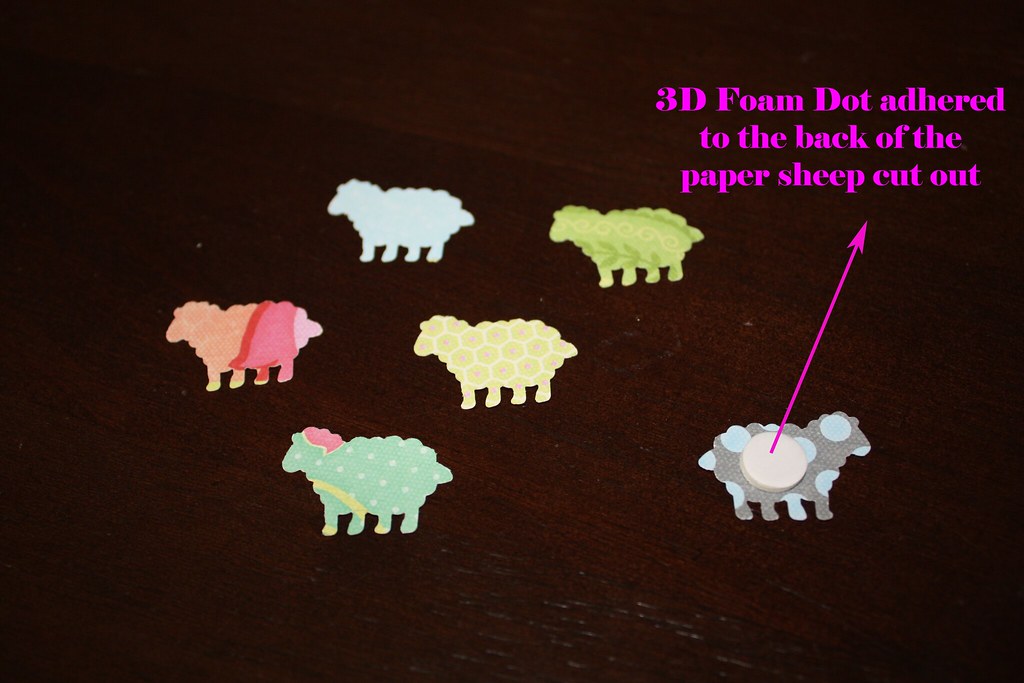
Once the sheep are all set, remove each sheep independently and place a 3D foam dot on the back (available at scrapbooking stores and most big box craft shops). At this time you really want to make sure you are happy with their placement. One by one, remove the protective backing off of each dotted sheep and press against the background paper, being careful not to bend the delicate paper legs.


Now that the sheep are all laid out and glued down, the next step is to attach the double mat to the background paper. To accomplish this and ensure the sheep maintain their 3 dimensional appearance, I use additional 3D foam dots around the outside of the background paper and place the mat squarely on top.

Lastly before framing, consider adding a personal touch like writing the birth date or baby name on one of the paper sheep (as this gift has yet to be delivered I refrained from showing you that info and ruining my friends' surprise). Don't forget to polish up the glass prior to delivery and be careful when you wrap it.


This is the perfect gift to make in batches and keep on hand for your upcoming baby shower invites.I hope that you've been inspired by this post to create your own custom nursery artwork.

Happy Crafting!

Friday 15 June 2012

From A - Babies, babies everywhere

It's been one of those years. You know, the one where everyone you know is having their first child. They feel a lot like the years where everyone you know is getting married or buying a house.

The year starts off fun. There is so much excitement at all of the good news. Inevitably, the enthusiasm starts to peter out and is replaced with the doldrum of social obligation and panic at the idea of having to plan yet another shower (with a new theme of course), come up with yet another great gift idea and in my case, furious furious crafting.

In one of my more desperate gift finding attempts, I found this on Pinterest and decided that I could DEFINITELY make that quilt in two weeks. No problem. I ordered a charm pack (Kona Classic Palette) and patiently waited for the goods to arrive. A week and a half later, Canada Post pulled through (a.k.a. 4 days pre-shower - eek!).

Still, it was only one teeny, tiny baby quilt. I mean how big are babies anyway when they're born? After some quick planning I realized that there were some colour gaps in the spectrum and that I needed a few fabrics extra fabrics to get me to 42 blocks. Eventually (a.k.a. two days later), I ended up with this:


Some pinning, some chain piecing led to this (forgive the crapster photo, I think it was about 3 a.m. at the time).


While pressing it all, I somehow managed to get red permanent marker in a pretty conspicuous spot and used that as a sign that it might be bedtime.


The next morning, after a bit of ripping...


and a bit more sewing, I ended up with this. It's not quite a finished quilt but it at least looks like it might one day become a finished quilt which will do for shower purposes. Fortunately, I still have a few more weeks before the bambino needs the "without pins" version of this project.


Now to get it quilted!

P.S. Yeah for kitchen counter tops! I absolutely love basting on my island. It's the perfect height. Lucky for me, my spouse doesn't complain too much when I commandeer our only counter space for crafting.