Showing posts with label a first lesson in colour quilt. Show all posts

Tuesday, 3 July 2012

From A - On Crinkles

As a relatively new quilter, I distinctly remember the terror I faced when contemplating the notion of throwing that first finished quilt in the washing machine.

While doing the tour of the online quilting community, I kept hearing about the crinking that happens when you wash a quilt. The consensus seemed to be that it was good but I loved the way my quilts looked pre-wash and wasn't sure that I'd agree.

To help other new quilters who aren't sure what to expect, I thought I'd give you a before and after comparison of my A First Lesson in Colour baby quilt.

The crinkling is caused when the batting shrinks during the first wash. I used Quilter's Dream Wool batting and it changed quite a bit after a pass through the machine.

With this particular quilt, the crinkling ended up softening the overall appearance of the bright high contrast colours and geometric construction.

It really changes the texture of the quilt but I'm starting to fall for the crinkly finish.

Monday, 2 July 2012

From A - Finished: A First Lesson in Colour

A long weekend means a finished baby quilt!

A first lesson in colour quilt

Very timely since I'll be seeing the recipient baby later this week.

A first lesson in colour quilt

Blocks are made with a Kona charm pack in the Classic colourway. I had to swap out and add a few colours to round out the colour spectrum but I'm really happy with how it turned out.

A first lesson in colour quilt

Simple (semi) straight line quilting sets off the simplicity of the blocks.

A first lesson in colour quilt

This is the first quilt where I've used Quilter's Dream Wool batting. It is so dreamy! In addition to being fire retardant (perfect for baby gifts) it is also very warm, and lofty.

A first lesson in colour quilt

I used a Robert Kaufman Dr. Seuss flannel for the back and since it wasn't wide enough, I picked up a coordinating flannel to get enough width for the backing.

A first lesson in colour quilt

I struggled with whether I wanted to use the black for the binding. Now that I have it together, I think it does a good job of framing the quilt, grounding some of the bright colours and tying the back and front of the quilt together by making the front more Seuss-esque.

A first lesson in colour quilt

A close-up of the label.

A First Lesson in Colour baby quilt

The combination of flannel and wool batting make this quilt so soft and snuggly. I will definitely have to make an Amanda sized quilt using both sometime before winter hits.

A first lesson in colour quilt

Stats:
Fabric: Kona Classic Charm Pack, Kona white
Backing: Dr. Seuss flannel, Kona Black, Rocket Scientist Flannel and Max & Whiskers
Binding: Kona Black
Pattern: None, inspired by this
Finished Size: 40" x 44"
Piecing and quilting done by me

A First Lesson in Colour baby quilt

Fast, easy and fun = another baby gift done!

Friday, 15 June 2012

From A - Babies, babies everywhere

It's been one of those years. You know, the one where everyone you know is having their first child. They feel a lot like the years where everyone you know is getting married or buying a house.

The year starts off fun. There is so much excitement at all of the good news. Inevitably, the enthusiasm starts to peter out and is replaced with the doldrum of social obligation and panic at the idea of having to plan yet another shower (with a new theme of course), come up with yet another great gift idea and in my case, furious furious crafting.

In one of my more desperate gift finding attempts, I found 
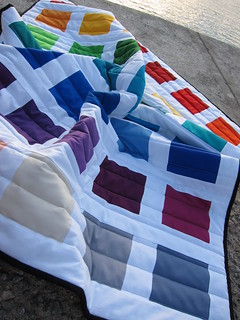
this on Pinterest and decided that I could DEFINITELY make that quilt in two weeks. No problem. I ordered a charm pack (Kona Classic Palette) and patiently waited for the goods to arrive. A week and a half later, Canada Post pulled through (a.k.a. 4 days pre-shower - eek!).

Still, it was only one teeny, tiny baby quilt. I mean how big are babies anyway when they're born? After some quick planning I realized that there were some colour gaps in the spectrum and that I needed a few fabrics extra fabrics to get me to 42 blocks. Eventually (a.k.a. two days later), I ended up with this:


Some pinning, some chain piecing led to this (forgive the crapster photo, I think it was about 3 a.m. at the time).


While pressing it all, I somehow managed to get red permanent marker in a pretty conspicuous spot and used that as a sign that it might be bedtime.


The next morning, after a bit of ripping...


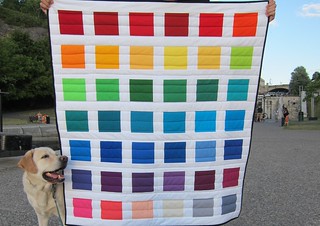
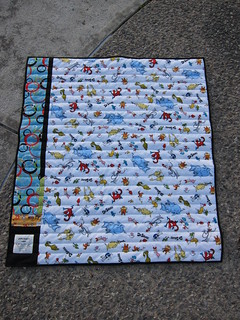
and a bit more sewing, I ended up with this. It's not quite a finished quilt but it at least looks like it might one day become a finished quilt which will do for shower purposes. Fortunately, I still have a few more weeks before the bambino needs the "without pins" version of this project.


Now to get it quilted!

P.S. Yeah for kitchen counter tops! I absolutely love basting on my island. It's the perfect height. Lucky for me, my spouse doesn't complain too much when I commandeer our only counter space for crafting.