Showing posts with label 2012 finished. Show all posts

Friday, 4 January 2013

From K - Finished: Wax Print Towers Quilt

The hubs and I spent the last week up at our family cabin in the beautiful British Columbia. Knowing that we were going for a while, I was sure to pack a bunch of my current WiPs. The main project on my "must sew list" was finishing off one of the two wax print quilts that are currently under construction, and I'm happy to say I successfully polished one off.
Having accomplished a nagging WiP from my pile, I sauntered down to my closest frozen lake with Mr. K to take photos so I could cross it off my list for good.

The idea of taking African fabric quilt photos in a snowy mountain range wasn't lost on my hubby as he took photos and I struggled with mittens and 10 layers of warm clothing. I think we both would have been much happier taking these photos under a warm sun in west Africa, but you gotta work with what you've got right? And a mountain view isn't exactly an eye sore now is it? Since a little juxtaposition never hurt anyone, I hope you enjoy the shots.

I mentioned a few months back that I lived and researched in Ghana for a summer. Last fall when a friend did a stint of her own volunteering abroad in Ghana, I gently persuaded down right begged her to bring back some fabric scraps from a local tailor/seamstress.

She more than carried out my request, bringing back plenty of scraps for two throw quilts, and now we'll each have a great momento from our travels abroad. This is her quilt, and I'm so excited to finally share it with her next week when she picks it up.


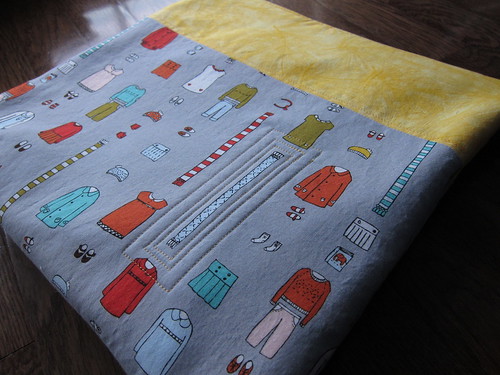
The backing for this quilt is made up of fabric generously gifted from friends (fabric a customary gift in Africa, if only it were in Canada too!). For the binding I chose a black and white print from my local Fabricland that had just the right amount of softness in the circles. The lack of crisp edges in this print really lets it blend in well with the wax prints and I think it holds its own.


When I was contemplating how to quilt it, I decided a simple random straight line criss cross would do the trick and I love the tecture it added to the final product.


Final Quilt Details:
  • Quilt Name: Wax Print Towers Quilt
  • Finished Size: lap size (56" x 72")
  • Fabric: Wax print fabric scraps, Fabricland Solid Black (Sashing), and Fabricland Black Dots (binding)
  • Pattern: my own design
  • Quilting: random straight line criss cross

And since I'm always a sucker for a foothold scenic shot, here's a quick snap shot of my view walking back from the cabin after the photo shoot for this quilt. A snowy winter day might not have been an obvious choice for a backdrop for this vibrant quilt, but gosh isn't it lovely!


I'm linking up to Finish it up Friday over at Crazy Mom Quilts. Swing by and check out all the great posts this week!

Monday, 24 December 2012

From A - Home Stretch

This holiday season has been a hectic one. Since finishing work on Friday at about 6:30 p.m., I did all of my Christmas shopping, made mashed potatoes, went to Christmas dinner at my in-laws, wrapped all of my gifts, cleaned my house, did laundry, went to a friend's birthday party, fought off a cold and barely slept at all.

Despite the chaos, I managed to wrap up the last of my gift sewing late last night. As you might have guessed, it's none other than another Kobo e-reader case. This one is for my mom and it is made with some leftover scraps of fabric. Specifically the flower print is Raindrops Poppies by Anna Maria Horner and the pink text print is Babble by Brandon Mably.


I'm amazed at how different this little case looks from the last one I made although it is the exact same construction and dimensions.


Now that all of the preparations are finished, I am looking forward to sitting in front of the tree with a mug of lemon honey tea and a good book while I wait for Santa to arrive (hopefully the tree skirt will get made next year).


Wishing you all a fun-filled holiday!

Friday, 30 November 2012

From A - New Toy

As an avid reader I have long debated about adding an eReader to the household. I love physical books and wasn't sure I'd like the experience of reading without the book.

I finally caved this week and bought a Kobo Mini. In honour of Cyber Monday, they were priced at only $50.00 and I figured that at that price, it was worth a try. When I went looking for a case for my new toy, all that seemed to be available on this side of the drink (ie. North America) was a $20.00!!! piece of plastic that made the back of the device look pretty but did nothing to protect the screen.

Kobo Mini Sleeve

My crafty instinct kicked in and I found this tutorial, re-jigged the measurements so that it would fit, dug through the stash for supplies and bought some Velcro. For about 20 cents, I had enough supplies to make three cases.

Kobo Mini Sleeve

I used some leftover Storm Clouds by Tula Pink from my Swoon quilt for the exterior and some Four Square voile by Anna Maria Horner from one of the baby blankets I made for the lining. I used some Pellon Thermolam Plus for the inter-lining/padding from my Hoop Travel Bags. Not a huge fan of Pellon generally but the Thermolam is the perfect thickness/density for these padded pouch projects.

Kobo Mini Sleeve

After thirty minutes of planning, and 1 hour of sewing I had a perfectly tailored and not bulky at all sleeve. In fact my Kobo is way smaller than any book I've read lately. Perfect for my new life as a frequent traveller/long-distance wife effective January.

Kobo Mini Sleeve

In case you were also sucked into the sale and want to make one of your own I cut my fabric 6.75" wide and 11.25" long. I used a upside-down dinner plate as a template for the top flap.

Kobo Mini Sleeve

With Christmas now less than 4 weeks away, I will definitely make at least one more of these.

Wednesday, 21 November 2012

From A - Making Furniture

I recently registered for a class to learn some upholstery basics. Our class project was to make a small ottoman. Over the course of the last three weeks, I hammered together a foundation made of wood, covered my foundation in foam and batting, carefully sculpted the corners using extra foam scraps and finally did the actual upholstery.

The end result: a modern yet neutral addition my household.


I opted to use an upholstery weight fabric for the exterior and think it was the perfect choice. Not only did I get over my fear of sewing heavy duty fabric on my home sewing machine but I am left with a piece that is durable enough to stand up to my vacuum and other everyday wear and tear.


Some time was spent attempting to match the print at the seams. Although it isn't perfect because of the size of the pattern repeat, I'm very happy with how it all came together. It looks cohesive but not unnaturally perfect.

I picked up some silver furniture legs from Lee Valley in order to give my little cube a more elegant look. Kelsey helped me position and attach them while visiting last weekend.


All in all I can't stop admiring my handiwork from every angle (even from the bottom!).


I'm not sure how much more upholstery work I'll do going forward but I'm pleased as punch that this little guy started as a pile of wood and fabric and has turned into something that we will love and use for years to come.

Sunday, 4 November 2012

From A - Weekend Sized

I took advantage of my free time this weekend to make another Hoop Travel Bag. I'm using this one to hold my hand piecing stuff for the Sawtooth Star block I showed you last week.

Hoop Travel Bag

I used some fabric from Aneela Hoey's Little Apples line for the main part of the bag. I added a bit of quilting to the front of the bag to highlight the fabric and add a bit more interest to an otherwise simple project.

A nice blue chevron print for the lining and a turquoise zipper finished the whole thing off. I love the contrast between the yellow fabric at the top of the bag and that blue zipper. I love this little bag even more than the last one that I made and am glad to have another one of these handy pouches in my crafting arsenal.

Hoop Travel Bag 

Nothing like a quick-finish project to cap off another great weekend!

Wednesday, 31 October 2012

From K - Finished: Prairie Ink Quilt

The first person to spark my interest in sewing was my grandmother. From a young age Amanda and I spent many days and nights in front of her old Singer making everything from bags to binder covers to scrunchies. She would let us pick our favourite fabrics out of the scrap bin for our mini projects, and would patiently explain each direction multiple times, all while patching my grandfathers work pants. I loved the idea of making something with a needle, a thread and some remnant scraps that no one else wanted, but I especially loved my time with Amanda and my grandma.


I spent most of my childhood on and off a sewing machine, but lost touch with it once sports and school and later university took over. When I picked up quilting a few years ago the first person I wanted to tell was my grandma, and I could tell she was very proud. This past year she turned 80 and I knew she would love a lap quilt to keep her warm - enter the Prairie Ink Quilt.


My grandma is a multitalented woman and could fall under a hundred titles - school teacher, published author, poet, pianist, gardener, master baker or volunteer extraordinaire just to name a few. In order to ensure I was able to capture some of her essence in her birthday quilt I decided to use the City News pattern by Cherry House Quilts, and then highlight some of her passions in the black and white prints. Since she's really more of a prairie girl and always seems to have a pen in hand, I thought a more apt name for this quilt would be Prairie Ink.


 This quilt was only the second free motion quilt I had ever worked on. I wanted something simple, repetitive and timeless, and I think these little loops worked out perfectly. I especially love the contrast that shows on the quilt backing between the the dense free motion quilting on the solids combined with the unquilted centre blocks.


On a 12 hour road trip home to see her this spring I hand bound the binding while my husband drove. By the time we made it there, I completely forgot to take 'pre-lived in' shots of the finished product. On my recently trip home last month I took a few photos, and while the wrinkles where this quilt was folded may appear somewhat less than blog worthy in some eyes, they remind me that this quilt is well loved and often used - and isn't that what we make quilts for?


Final Quilt Details:
- Quilt Name: Prairie Ink
- Finished Size: 54" x 72"
- Quilt Top Fabric: 18 Kona Solids and 18 various black and white prints
- Quilt Backing Fabric: Kona Berry, Kona Dark Violet, Michael Miller Old Script in Black
- Quilt Binding Fabric: Kona Dark Violet
- Pattern: City News by Cherry House Quilts
- Quilting: free motion little loops (quilting done by me)
- Best Category: Throw Quilt


Be sure to check out all of the beautiful quilts on electronic display over at Amy's fall Bloggers Quilt Festival. I am linking this quilt up under the Throw Quilt category.  You can find it linked as #522. I don't know about you, but tomorrow night I plan to curl up under my nearest quilt with a hot cup of cocoa to dream away my evening in all the linked up quilted treasures!

Amy's Creative Side

Monday, 22 October 2012

From K - Finished: Smitten for each other

Today marks the final days of the Great Canadian Quilt Off 'eh! and I'm thrilled to finally show you my final product.

Week 1: Cut your fabric and start working on blocks
Week 2: Finish making blocks
Week 3: Attach borders and finish quilt top
Week 4: Baste and quilt


This quilt was so much fun to sew up, and I really like how it shows off the fabulous Cuzco prints. In total I made 20 stars (4 columns of 5 rows). In the end I'm really glad I followed Amanda's lead and added a fifth row, as I think this final quilt size will make for lots of couch time.


For the backing I chose a fun numerical text from Ikea that didn't fight with the top for attention. I especially love the timeless nature of this print, I mean when has numbered text ever gone out of style?


Choosing a binding for quilt was tougher than I had expected it to be. I knew I wanted a colored pattern but I couldn't decide immediately on which one. Once the quilt top was finished, I figured a tone on tone blue would do the trick. Here I've used a print from Tea Decadence by Mary Engelbreit.


Final Quilt Details:
- Quilt Name: Smitten for Each Other
- Finished Size: 56" x 70"
- Fabric: Cuzco by Kate Spain; Kona White; Britten Nummer from Ikea, Tea Decadence by Mary Engelbreit.
- Pattern: Smitten by Cluck Cluck Sew
- Quilting: various


Last week during my trip back home to Manitoba, I attended a good friend's wedding. As part of their wedding gift, I gave the couple this quilt and marked it with a custom label. I couldn't imagine this quilt going to a better home, and I hope they get years of enjoyment from it. 


Tuesday, 16 October 2012

From A - One for the Road

Duffle Bag

I finished my duffle bag this weekend and I have to say, there is something about making a bag that gets me every time. I always find that as I sew along, I look at all of the fraying seams and bits that don't line up just right and somehow convince myself that the bag will probably look like the sewing equivalent of a child's macaroni craft.

Once you get that final seam sewn, you turn it inside out and amazingly, the pile of fabric somehow turned into a useful and totally awesome bag.

Duffle Bag

I used some old green and blue denim I bought at my local Fabricland a few years ago when I thought I might try my hand at making a pair of shorts for the summer. I used some of the leftover feather fabric from my Wiksten Tank for the lining and added a few hints of the New York print from Jay McCarroll's City Centre collection for the zipper pull tabs and seam binding.

Duffle Bag

The pattern was put together by bag maker extraordinaire, Guy Latulippe. He just released his series of duffle patterns in all different sizes. The pattern is pretty straightforward and totally satisfying.

Duffle Bag

I've already bought some gold glitter denim to make a second one.

Friday, 28 September 2012

From K - Finished: Boys + Birds + Bees Quilt

I've already said it once, twice, and three times over, but I have to say it again... I am head over heels for Tula Pink's newest line, the Birds and the Bees! While I was recently on vacation I couldn't help but continuously think about the possibilities for my B&B stash (even while sitting on camels no less!). Once I returned it took everything in me to finish my long standing WiP (my now finished wax print quilt top) before I allowed myself to clear my design wall and move on to starting something new.


Itching to pick up a rotary cutter and slice into my first ever set of charm packs, this weekend I whipped up this baby quilt for a good friend who recently had her second baby boy. I'm definitely of the mind that while boys may always love blue and green, they can also be open minded. To liven up Megan's male dominate household, I made sure to add some depth by incorporating some of the other rich jewel tone prints in Tula's line such as the golds, plums and browns.


I love the way each print stands on its own against the stark white of the negative space. I used Cluck Cluck Sew's Inside Out pattern and think it was the perfect fit for this line. I can definitely see myself using this pattern again in the future for other prints I may want to show off.


Because this is a baby quilt and we're nearing into colder months, I thought a flannel backing would be a good fit for this gift. I used a herringbone print from Woolies by Bonnie Sullivan and Maywood Studies,  and I am so please with how soft it is to the touch, even after washing. While the pattern is quite subtle and understated, I like how it doesn't fight with the quilt top for attention.


Since I went pretty neutral on the backing, I wanted to add a bit of pop with the binding. I used a vibrant chartreuse Kimono print by Ty Pennington, and I think it did the trick.


Final Quilt Details:
  • Quilt Name: Boys + Birds + Bees
  • Finished Size: baby quilt (48" x 36")
  • Fabric: Kona Cotton in White, 18 prints from the Birds and the Bees by Tula Pink
  • Pattern: Inside Out by Cluck Cluck Sew
  • Quilting: stipple

Lastly I wanted to give a special shout out and a huge thank you to a dear friend who not only graciously took all of the beautiful photos in today's post, but also did her best to catch my good side in this last photo (trust me it's not an easy task!). Love you Brit!


Thursday, 27 September 2012

From A - Chill Chaser


I know I've complained about the changing weather a few times now. The leaves have just barely started to turn here in Toronto but somehow a frigid and persistent wind has been able to make it feel a little bit like winter. Good news for all of you readers is that I am finally doing something about it. Enter Anna Maria Horner's Figure 8 Scarf.


I ordered the fabric for this scarf last winter and then never managed to get around to sewing it up! It's a bit bulky to wear but overall, I think that it will add a much needed shot of colour to my fall wardrobe.

Best part of all is that it only took me an evening from start to finish. Gotta love those instant gratification projects!

Sunday, 23 September 2012

From A - Tanks, That Was Fun

After a truly crazy week, I managed to finish my second Wiksten Tank and take advantage of a few hours without rain to get some outdoor modeled shots of both tanks.

The first one I made was a bit of a muslin before I started cutting into my prized Liberty of London tana lawn. The fabric I used for this first one is a gorgeous quilting cotton from Martha Negley's Farmington collection.


I really love this print and plan to use it as the lining in the duffel bag I plan to make in the next few weeks.


The second one is made from my precious stash of tana lawn in Wooky Hole. I love the seemingly random mixing of colours in this fabric. The print has so much variation and detail. It really reminds me of striations found in rocks and minerals. As with my feather tank, I took the time to make a perfectly matched breast pocket.


This is the first time that I've actually sewn with any of my Liberty. It is such gorgeous fabric with such a fabulous hand and drape. It was definitely a bit nerve racking to sew since the fabric is so fine and lightweight. I'm hoping that this simple tank will inspire me to crack into my Liberty stash and make a few more projects from it before too long.


I am really surprised how the different drape in the two fabrics changed the way each of these fits. I don't make many garments but I'm really happy with how these tanks turned out. I've been wearing them constantly since finishing them up (with cardigans since the fall chill has definitely set in).


Hope you are all enjoying a fantastic weekend!

p.s. - is anyone else beyond excited to get their hands on Liberty's line of quilting cottons? I'm stalking searching etsy and other favourite fabric sellers websites almost daily. I'm hoping to get my hands on a FQ bundle of all 55 prints. Let me know if you have any leads!