Showing posts with label wax print quilts. Show all posts

Wednesday, 8 January 2014

From K - Finished: African Wax Print Quilt

Nearly a year and a half in the making, this was undoubtedly the longest unfinished WiP in my pile. Knocking it off as my first finished project in 2014 may just be the perfect way to kick off the new year.

Kelsey's Magic Numbers African Wax Print Quilt
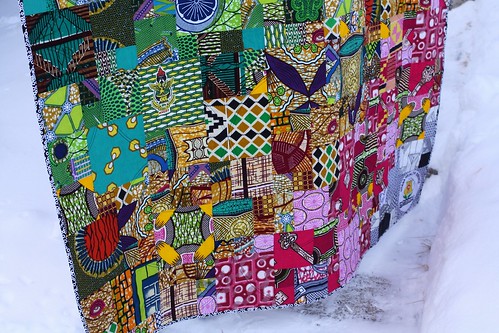
I pieced together this quilt using a bag full of wax print scraps brought back from a tailor in Ghana by a work colleague, as well as quite a few prints that I purchased myself when living there in 2008. Between my yardage and my colleague's scraps, and a few prints that I purchased from an etsy seller in the UK, I actually had enough fabric in the end to make two throw quilts (you can see the one I made for my colleague as a trade for hauling back the scraps here).

Kelsey's Magic Numbers African Wax Print Quilt
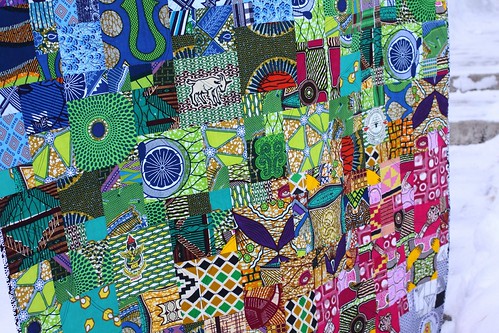
Since I had limited fabric at my disposal (mostly scraps), and planned to make not one but two quilts, I was very conscious of the need to use up all of my tiny pieces. Using the magic numbers method (described by Sew Katie Did in her tutorial here), I was able to maximize my fabric and still eek out a decent sized throw quilt.
You can read more about my process of making this quilt here and here.

Kelsey's Magic Numbers African Wax Print Quilt
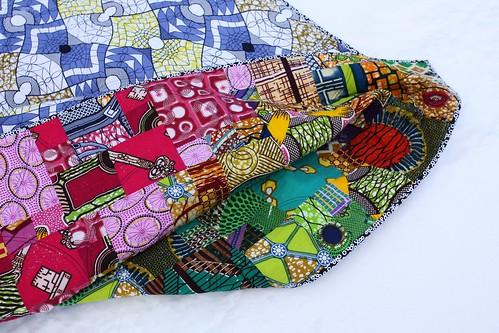
When I could manage it without loosing valuable fabric, I tried my best to fussy cut a few prints. The goat in the above photo reminds me so much of my time living and travelling in Africa. A few other fussy cuts included a 'Rollback Malaria' decal, a fish print, and some emblems for various organizations such as Ghana Health Services and an agricultural college in Tema.

Kelsey's Magic Numbers African Wax Print Quilt
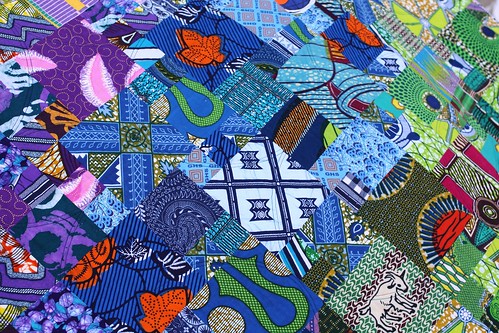
Given that my wax print fabric stash was so limited, I caved and ordered my backing fabric from a distributor in the UK that specializes in authentic African fabrics. While the print is beautiful, in the below picture you can see that the style is slightly different. I only wish I could have afforded to fly back to Ghana myself to buy more at the local market. If only budgets were unlimited right?!

Kelsey's Magic Numbers African Wax Print Quilt
Final Quilt Details:
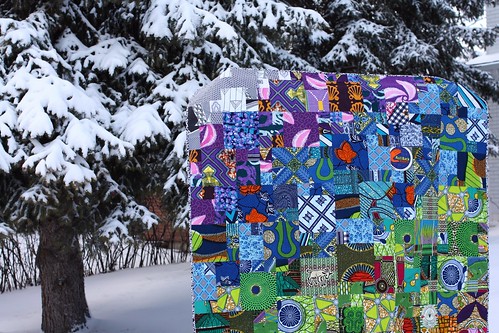
  • Quilt Name: Magic Numbers African Wax Print Quilt
  • Finished Size: lap sized (54" x 72")
  • Fabric: collection of wax print fabric scraps and yardage purchased on trips from Ghana, West Africa, plus a few FQs from an etsy seller in the UK (top); wax print yardage from an etsy seller in the UK (backing fabric); Fabricland Black Dots (binding).
  • Pattern: magic numbers tutorial by Sew Katie Did
  • Quilting: double line of curved diamonds quilted on my home machine (can be seen on the pink prints on the photo above)
Kelsey's Magic Numbers African Wax Print Quilt
Over the weekend I celebrated finishing off this old UFO by starting a brand new project. I mean what's one more WiP now that I that I knocked an old one off the list?
This is my fifth completed project for the Q4 2013 Finish A-Long - read more about my other goals here.


Friday, 4 January 2013

From K - Finished: Wax Print Towers Quilt

The hubs and I spent the last week up at our family cabin in the beautiful British Columbia. Knowing that we were going for a while, I was sure to pack a bunch of my current WiPs. The main project on my "must sew list" was finishing off one of the two wax print quilts that are currently under construction, and I'm happy to say I successfully polished one off.
Having accomplished a nagging WiP from my pile, I sauntered down to my closest frozen lake with Mr. K to take photos so I could cross it off my list for good.

The idea of taking African fabric quilt photos in a snowy mountain range wasn't lost on my hubby as he took photos and I struggled with mittens and 10 layers of warm clothing. I think we both would have been much happier taking these photos under a warm sun in west Africa, but you gotta work with what you've got right? And a mountain view isn't exactly an eye sore now is it? Since a little juxtaposition never hurt anyone, I hope you enjoy the shots.

I mentioned a few months back that I lived and researched in Ghana for a summer. Last fall when a friend did a stint of her own volunteering abroad in Ghana, I gently persuaded down right begged her to bring back some fabric scraps from a local tailor/seamstress.

She more than carried out my request, bringing back plenty of scraps for two throw quilts, and now we'll each have a great momento from our travels abroad. This is her quilt, and I'm so excited to finally share it with her next week when she picks it up.


The backing for this quilt is made up of fabric generously gifted from friends (fabric a customary gift in Africa, if only it were in Canada too!). For the binding I chose a black and white print from my local Fabricland that had just the right amount of softness in the circles. The lack of crisp edges in this print really lets it blend in well with the wax prints and I think it holds its own.


When I was contemplating how to quilt it, I decided a simple random straight line criss cross would do the trick and I love the tecture it added to the final product.


Final Quilt Details:
  • Quilt Name: Wax Print Towers Quilt
  • Finished Size: lap size (56" x 72")
  • Fabric: Wax print fabric scraps, Fabricland Solid Black (Sashing), and Fabricland Black Dots (binding)
  • Pattern: my own design
  • Quilting: random straight line criss cross

And since I'm always a sucker for a foothold scenic shot, here's a quick snap shot of my view walking back from the cabin after the photo shoot for this quilt. A snowy winter day might not have been an obvious choice for a backdrop for this vibrant quilt, but gosh isn't it lovely!


I'm linking up to Finish it up Friday over at Crazy Mom Quilts. Swing by and check out all the great posts this week!

Wednesday, 12 December 2012

From K - Wax print WiP

I don't know about you, but I'm 100% gold star motivated (come on admit it, you love those stickers too!). But honestly I'm extremely goal orientated and nothing brightens my day more than checking off another WiP from my 'to sew list'. Today I'm happy to share that I finished my second wax print quilt top, which is one step closer to quilting them both!
Since daylight hours are fleeting now that it's winter, and I didn't have enough time to leave town to find a pretty barn, a rustic fence will have to be the next best thing for today's photo shoot.
To create this quilt top, I made six 8.5" wide columns, cutting my scraps into various heights. To finish the columns off, I added 1.75" sashing to separate the blocks.
I knew I wanted the sashing to act like a frame around each column and tested out a couple options before settling on black. What separated it from the other options was that it allowed the wax prints to take center stage, keeping the colours bright, and not distracting your eye from the real focal point.
If you're interested in checking out my first wax print quilt top, you can check it out here. I'm really excited to quilt both of my wax print tops in the near future.
In the meantime, I thought I'd leave you with a little shot of my helper today. Oh how I love this face.

WIP Wednesday at Freshly Pieced

Wednesday, 19 September 2012

From K - Magic Wax Print Quilt Top

I'm fresh off vacation, soaking in the crisp cool fall air, and polishing up my first of two wax print quilts has been weighing heavy on my mind. This past weekend I hunkered down and pieced together my quilt top, using the magic number squares that I had previously prepared.


Because this quilt top is created entirely out of remnant fabric pieces brought back from Ghana, I didn't have a consistent range of prints in each color, so I did my best to distribute my prints as broadly as possible within their colour grouping. Using 2.5, 4.5, and 6.5 inch squares, I arranged my quilt top using a loose rainbow gradient to help provide a general sense of organization to the quilt.


Last Friday I had an unfortunate run-in on the basketball court and now my foot is sprained... and hopefully not broken (tomorrows x-rays will tell). Determined to finish this quilt top over the weekend though, I took the opportunity to put my 'Start/Stop' Button into good use while I elevated and iced my ankle. I have to say that it was a little awkward at first, but in general, it worked quite well for straight line piecing. On a slower setting, and using a few pins, I even managed to line up my seams quite well.


Though this is just the first of two quilt tops I plan to make with this fabric, I am pretty pleased with how the first one turned out. Playing around with magic numbers was a fun experiment, however it was more time consuming that I had originally thought it would be. For my second wax print quilt top, I might just do some improvisational piecing and we'll see where that leads.


This week I plan on taking a break from the wax prints and starting back up on a couple of baby gifts that have been on the back burner. I'm looking forward to a couple of fast completed projects in the future.


Tuesday, 11 September 2012

From K - Quilt Top Planning (Using TouchDraw)

I recently bought an iPad and I cannot say enough about how much I love it. It has made blogging a cinch while on the run, it takes relatively high quality images when my DSLR isn't close at hand, and most of all, it makes for one of the best quilt top planning tools. I have tried designing quilt tops using blank paper, grid paper, excel, pencil, and markers, but nothing comes close to the TouchDraw app. I won't go into a huge explanation of how it works, but I thought it might be helpful for you to see how it can help organize a quilt layout, using my current wax print quilt as an example.


In July I posted about my quilt top layout for the first of two wax print quilts. I decided to go the route of using magic numbers (2.5", 4.5" and 6.5" square blocks), however I was worried that it wouldn't look random enough given the consistent sizes. In order to minimize the effect of having large stretches of blocks butted together, I went to touch drawer to lay out some "random-ish" type areas.
In the above image, you can see that each quilt area is divided by colours, and then further divided by numbers within each colour group. I specifically numbered them so that I would remember which order to sew the blocks once they were all prepared.

Using that TouchDraw illustration as a template, I began laying out my previously prepared 2.5", 4.5" and 6.5" squares according to the grouping requirements. Even though I have yet to complete the entire quilt top layout, you can see that many of the numbered blocks from my TouchDraw illustration are quite easy to identify on my design wall already.


Once I had quite a few of my blocks complete, I thought I would sew a few blocks together to see how it came along. In this next image you can see that some of the numbered blocks on my drawing are now even easier to identify on the wall.


I've started using this tool on a couple of other future projects and I'm looking forward to seeing them come into fruition as well. I still have a lot to learn on this app, but so far I am pretty impressed with how easy it is to use, and how simple and quickly you can manipulate quilt top designs.

Monday, 3 September 2012

From K - Craft Room Reveal (Part 3 - Design Wall)

Welcome back to the third and final episode of my mini craft room reveal. The last and final wall of my craft room is the wall that has me most excited... why you ask? because it's a ginormous design wall of course (emphasis on gi-nor-mous)!

When you first walk into our new craft / sewing space, this is your typical first glimpse of the room:


You'll notice that two of the walls are pretty bland, and pretty white... but that's all to ensure that the main feature of the room is always ever changing, and consistently remains the main feature. Right now that wall is looking a little something like this:


Look progress on my first of two Ghanian wax print quilts! But I digress... so back to the topic at hand.

This design wall has been a work in progress for some time now. I am fortunate to have an amazingly handy husband and he took some serious time planning this sucker out to make it just right. It didn't always look like this... actually to be quite frank, it looked a lot like this for some time:


The hubs used a combination of three foam insulation boards, two sheets of white laminate, and some remnant wood to create two portable 6.5' x 4' foot design panels (6.5' x 8' feet when combined). Each design panel is hung using hardware found at a local hardware store, and the panels can be moved about using handles that are attached to the outside edges.

  
Undoubtedly my favorite aspect of this design wall thought is that it's multifunctional! When I hang the board batting side out, I can lay out a project. If I hang the panels laminate side out I can spray baste a quilt, and if I lay the panels out on the ground, I can use the laminate side to pin baste on (saving our hardwood floors from future scratches).

Because our walls are near white right now, the back of my design board doesn't show up prominently, but here is a peek to settle your curiosity:


I count myself truly lucky to have my own sewing space, and a giant design wall is definitely the cherry on top. This wall is going to get some major use!

Friday, 27 July 2012

From K - Desperately seeking a design wall

Tonight my hubby helped me take the first steps toward building my new design wall, and I couldn't be more pleased to get it started. One of the fundamental reasons why I was so desperate for my own craft space was to reduce the fabric explosion that currently invades my living room. Somehow a couple small fat quarters migrates into the room, followed by a  multitude more, and then it all decides to reside there for weeks on end. Having guests over means there is no longer a simple requirement to tidy up, but instead it creates the need to pack it all up or learn to entertain around it.

Now that I have my own dedicated craft room I thought this phenomenon would die out, but little did I know that even with a new space, fabric still continues to spread. Here is a photo of my new convertible sofa in our guest/craft room...


It looked like that for a couple of days before my wax print quilt required more space... so now it's begining to look more like this...


For a while now I've had a significant portion of my squares cut to create this next quilt top but no space that is large enough to maintain it all laid out together at once. I'm getting desperate for a design wall now to ensure the colors are balanced properly before I begin to sew it together. The picture below shows some of the green fabrics that I've cut so far (unfortunately this couch doesn't have room for all of the blues, purples, oranges and pinks).


Here's hoping we can polish this board off on the weekend so the rest of the colours can be laid out together.

Saturday, 14 July 2012

From K: Prep for a cold-ish week ahead

This past week in western Canada has been sooooo HOT and I don't know about you, but when it's hot and my house is without AC, I definitely limit my indoor exposure. At the expense of my craft room reno and planned sewing projects, I spent most of my time this week outside in the sunshine. Up here in Canada summer doesn't last for long so I figured this week I should enjoy it. With that being said though, I did my best to prep, plan and get supplies for the craft room reno, as well and begin the start of cutting my first of two wax print quilts.


I've had a really hard time starting my wax print quilt for the past few months now. Knowing that the opportunity to get fabric straight from Ghana again in the future is an unlikely event, I have worried about wasting what little stash I have.


This week I decided to make a plan and just jump right into preparing the first quilt top. Katie from Sew Katie Did posted last fall about scrap quilting using magic numbers. I thought this might be the best 'structured but still somewhat unstructured' way to tackle these vibrant african prints. The above photo shows the beginnings of some prepped squares that I plan on sewing up soon.


This upcoming week looks to be more temperate so here's hoping I can bare the thought of sitting indoors long enough to start up my Janome. In the meantime I'm saying goodbye to my vibrant purple guest room in order to make way for a fresh, modern sewing space!