Friday 31 August 2012

From A - Crawling is Movement

I'm out of town again this weekend and was looking for something portable to bring with me. I finally started quilting the Toronto skyline quilt that I showed you way back at the beginning of summer.

This project has a lot of new challenges for me. It is the first time I've drawn a cityscape, the first time I've made my own pattern and the first time I've done any hand quilting since I was about 12.

I have a bad habit of avoiding things when I'm not 100% sure of how I am going to tackle them. I have this constant (and irrational) fear of doing something "wrong" or messing something up. This fear generally results in me just putting things aside when they get tricky, only to dust them off months later, buckle down and realize that it wasn't such a big deal after all. That is exactly what happened with this project. I had a few problems when I transferred the design onto the fabric, started thinking about how difficult the hand quilting was going to be and then promptly shuffled it onto the back burner.

Apparently all that was needed to get me to rescue this quilt from the timeout room guest room was the prospect of two 5 hour train rides over four days and the thought of a long weekend away without a project to keep me company.


It's not much to look at yet but I'm so glad that I am working on this. I was starting to worry that I would might never get back to it. In addition to the relief at finally overcoming my fear based procrastination, I'm finding that hand quilting is every bit as relaxing and satisfying as i dreamed it would be. I still have lots of quilting left to get this done but at least I'm finally moving.

Wednesday 29 August 2012

From K - Craft Room Reveal (Part 2 - Stash Storage)

Before I had a craft room, I had a craft closet, and before that it was a simple craft trolley. About 6 months ago I decided a trolley wasn't cutting it anymore, but I hadn't yet committed to downgrading our guest room. As a compromise I invested in a practical storage cabinet so every little scrap could have a home.


While this closet didn't solve all of my sewing woes (like providing a dedicated corner to sew in), it has been one of the smartest sewing related purchases I've ever made (for my sanity especially!). I thought that during my sewing room reveal you might want a peek at where all the goods are stored, and how I manage my stash.

Lets open those doors up and have a peek shall we?


This closet system is roughly 8 feet tall, and while I'm nearly 6 feet myself, I figured that top shelf wouldn't get all that much use. I used a couple of large boxes from Ikea to keep it simple and store items I don't use as often, such as wads of stuffing, and sock monkey materials.


On the second highest shelf you can see three wicket baskets that I found at my local Shoppers Drug Mart. I put a blue tag on each basket listing the current contents. These baskets are my  valor laden effort  desperate try  half successful attempt at organizing my current WiPs and keeping them down to a reasonable number. The first basket is full of baby fabrics for various projects and I don't see that tag being removed anytime soon. The second and third baskets currently hold my wax print fabrics while I work at completing those two quilts.


Below the wicker baskets I have a shelf that holds my mini fabric bolts of 0.5m or greater (I use comic book boards as bolt supports), as well as various spray bottles (glue adhesive, 505, spray starch etc). I used some smaller ikea storage boxes to house my receipts, labels, fasteners, and resources (including patterns, colour charts and inspiration photos). Lastly there is a binder along the right side that holds my purchased PDF patterns that I have printed out.


I won't bore you with the layout of each drawer but I will show you a couple to satisfy your curiosity (you know you want to see inside!). Here is a peek of the top drawer. From the back, left to right, it's filled with mini quilt sandwiches to practice free motion quilting, my Machinigers, a collection of storage bags for projects on the move, and a large stash of Shout Color Catchers. In the front row, I have a sewing box filled with notions, the stitch chart for my Janome, a basket of selvages, and an assortment of fabrics by Anna Maria Horner (Innocent Crush), Amy Butler (Soul Blossom), Joel Dewberry (Heirloom, and Aviary Two).


The second drawer holds additional fabric storage for a number of completed projects that will soon be gifted, my Janome quilting extension table, yardage (4+), charm packs, some miscellaneous FQs and two quilt projects that are up and coming (I custom bundled each using various fabric lines).

 
The third drawer in my storage cabinet holds my scraps. I tend to toss very small scraps and hold onto the somewhat larger pieces that are most likely to be used. The first bin holds red-orange-yellow-gray scraps while the second bin holds green-blue-purple-grown scraps. The third bin holds black and white scraps, and the forth bin holds solids. I can guarantee that more scrap storage will be needed soon but there is still quite a bit of space to space behind those bins for when I spill over.


The last few drawers hold my batting, thinsulate, and template plastic, along with my non-sewing related craft supplies like paper, frames, punches, stamps etc.

I am really glad that I invested in this cabinet and I love having everything organized and at my fingertips now. It allows me to rearrange my stash, take inventory of what I have, and prepare upcoming projects, all while looking at my options in one place. Call me weird or call me crazy, but this closet is my happy crafty place.

Monday 27 August 2012

From A - Whirling

I'm pretty spoiled. Since my husband works only a 5 minute walk from our home and generally works much shorter hours than I do, he has taken it upon himself to be the food provider of the household. He does all of the groceries and cooking. Most nights I get to come home to a home-cooked meal that is ready as soon as I walk in the door. Unfortunately for me, my husband is away on a business trip again this week. I usually scrounge for leftovers in the fridge or eat take-out in his absence. However, after 2 weeks of husband absentia things are getting desperate in the fridge and I can't handle the prospect of another night of fast food.

Long story short. I cooked last night. It's probably one of the first times I've made dinner in the last 5 and a half years (which is funny since I used to work in a kitchen and am a prolific baker). One thing I can say for certain is that cooking is nothing like riding the proverbial bicycle. Skills get rusty. In addition to having no idea where to find various kitchen implements, your brain needs to really work to get things done. Like yesterday, I caught myself with a pot full of uncooked pasta and not a drop of water in sight. Embarrassing yes, but fortunately the dog was the only witness.

After a couple of hours of fumbling around the kitchen, I ended up with a delicious casserole of spicy and savoury pasta. Success!! More encouraging is the fact that I have a ton of leftovers which should help me make it through the week. I might have to try this cooking thing again sometime.


Last week I managed to stay focussed on Carnival and pick-up some white thread from the fabric store to get 'er done. Over the weekend, I got all of my individual blocks finished and now I just need to assemble them into larger blocks, sew them together to make the quilt top and attach the borders.


What can I say, it's been pretty smooth sailing. Julie's pattern is extremely well-written, clear and has lots of colour illustrations. The blocks all have bias seams in them so I would strongly recommend using a walking foot to piece everything together and to be very careful when pressing (ie. use a dry iron, lots of finger pressing, and pressing as opposed to dragging the iron across the pieces) in order to avoid misshapen blocks.


Those who know me know that I love having as many options as possible for as long as possible. This pattern was a challenge for me in that since the blocks alternately lean left and right, that you effectively have to decide on your layout before you even start cutting. Eeek! I am anxious to see how the layout I chose up-front will work for me in the end. It's always so hard to be pushed out of one's comfort zone. This is the layout I put together originally using TouchDraw. I don't think I'm going to end up sticking with it (I've definitely changed some of my blocks around) but I thought I would show you how I started planning this quilt.


The only other glitch was a personal beef the Lazy Angle Ruler. I love Creative Grids' rulers. I find the markings are easy to read and the "gripper dots" are very good at keeping things where you want them while you cut. That said, the Lazy Angle Ruler requires you to flip the ruler over to cut some of the pieces. There are even measurements printed on the wrong side of the ruler to facilitate this. Unfortunately, the Lazy Angle Ruler is slick and smooth on the non gripper dot side of the ruler. Putting this slippery side of the ruler on fabric to make a precision cut is like trying to use a dull knife to slice a tomato a.k.a. a frustrating mess.


While I was at the fabric store buying thread, I stumbled across some adhesive gripper dots that you can attach to a ruler to make it slip less (didn't even know there were such things). The dots were a big help in managing the slippage situation but unfortunately were thick enough that they made the ruler float above the fabric and prevented the blade (a brand new one) from cutting smoothly in a single pass. After a few minor adjustments in my ruler holding technique, I was able to get everything to work perfectly. Gotta love the gripper dots!


I can't bring myself to throw these "sail boat" scraps generated from making the Carnival blocks in the garbage. Any thoughts on what a girl might do with 80 of these?


Friday 24 August 2012

From K - Craft Room Reveal (Part 1 - Productivity Table)

Working on a quilt top is one of my favorite aspects of any quilt. I love the motion of cutting the first few pieces and getting a glimpse of what the project will turn out to be. When I initially began thinking about making a sewing/craft space, one of my main objectives was to have a comfortable and permanent productivity station. About a month ago I gave you the first glimpse of this table when I posted a table top ironing board tutorial.


My intention with this table was to create some permanent space to both cut and iron on while I work on a project. Lucky for me, my brother was getting rid of this ikea desk and I knew right away it would be perfect for the task at hand. The best part about this table is that the saw horse legs are height adjustable using wooden dowels, so the table can be lifted to accomodate my tall figure. Cutting can be extremely painful on my back if have to slouch over a short table top, so this works wonders for me.


Realistically, this productivity table has become more of a productivity wall. Early on in my planning process, I knew I didn't want a heavy desk against this wall, but I still needed some storage. This desk works well for me as I have clutter free storage on both sides.

On the left hand side of the desk, I have a wooden notion tackle box that was handmade by my father-in-law. I have been oohing and ahhing over antique sewing boxes on ebay for years and he definitely took note last christmas when he gifted me with this. I currently hold my more used notions in this tackle box, including spools of thread and my gingher scissor collection. To the right of the notion box, I have two wicker baskets placed on the saw horse base. One basket holds marking notions, a tape measure and a jar of pins. The second basket is used to collect scraps when I'm cutting on the table top.

 
In the right hand saw horse leg, I store my Janome so it can be accessed quickly when I need it. A well placed screw in the wall holds my rulers when they aren't in use, and a closet knobs holds my current favorite tote for when I'm out and about.


In the photo above you get a closer view of my new craft room drapes. I used a combination of two Anna Maria Horner prints from LouLouThi along with some Kona Coal to add some visual weight on the bottom third. It was a pretty strong fabric choice and I have to admit I was a bit worried at first, but once I hung them I felt nothing but inspired. I think they made the perfect addition.


In the back left corner of this final picture you can barely make out a folding table. Currently I pull this table out and set it up against the far wall when I sew with my Janome. It shakes a bit if I force the pedal, but for now I'm enjoying the flexibility it gives me to open the space up when I need it. Perhaps in the future I'll find a better long term solution.


I am also on the hunt for some half decent track lighting to help bring some light into the space. The dome shade we have right now isn't cutting it for late night sewing fests and as fall and winter approach, I see more of those in my future.

Wednesday 22 August 2012

From A - Distraction

While I try to stay focussed on the goals I set in my summer hit list, I can't help but feel distracted by a few project ideas that have been rolling around the old cranium cavity. This thinking has since devolved into stacks and stacks of fabric being scattered around our living space (ie. condo) and is dangerously close to becoming a bad case of startitis.

In the living room, you'll find this lovely little bundle. I bought this a few months ago from Pink Castle Fabrics with a coupon code with the intention of making a bowtie quilt using this tutorial by Katy over at Monkey Do. I had sort of forgotten about the project until I went to my grandparent's place in early August and spent hours snuggled under the bowtie quilt that Kelsey had made for my grandmother's 80th birthday. Since coming home, I have been fighting the urge to cut into them.


My night stand is playing temporary home to a fat quarter set of Joel Dewberry's Heirloom collection (apparently I'm off on a bit of a yellow and magenta jag). I'm thinking it would do as a Rubik's Crush quilt for my childhood friend who after having two sweet little boys is now expecting her first little girl. She is over-the-moon excited to have another lady in the household that can balance out some of the testosterone. I really like that this is a larger quilt, and will be useful long after the baby starts walking.


After seeing some gorgeous quilts being made with Tula Pink's Birds and Bees collection and after Kelsey's recent purchase (we're nothing if not competitive with each other), I stumbled upon a full yard bundle of every print in the collection. I snapped it up since it seemed like the only way to really ensure that I had enough of these gorgeous fabrics. This stack has taken up residence in the guest room.


My husband recently started working in California. He's just part-time at this point and still spending most of his time in Toronto but starting in January, he'll be moving there and we'll be doing the long-distance marriage thing until I can join him sometime next summer. I figured that if I'm going to spend 11 hours a month on planes, I'd better have a cute handmade weekend bag to take along with me. I found this blue and green denim that I bought back when I thought I would attempt a pair of shorts for myself (haha!) and decided that it would lead a much happier life as a cute duffel bag. I'm still trying to decide what fabric I'll use for the lining so in the meantime, the denim is cosying up next to the stash in the den.


Lastly I bought a some Salt Air charm packs a few months back planning to make Rachel Griffith's Smitten quilt. I bought enough fabric to make 20 blocks instead of the called-for 16. I love the weather beaten look of the colours used in this line and am anxious to start cutting into it. I couldn't help but to organise these fabrics by colour and print and put them in one of my WIP bins so they are ready to go as soon as I give myself the all clear.


What do you think? Which of these would you start now after I make some more progress with Carnival?

Monday 20 August 2012

From K - The Quilt that Started an Obsession

One of the posts that I love reading most from other quilt bloggers is the story behind their first quilt. It's often this first quilt that leads to a lifetime of sore backs, nimble fingers and a whole lot of handmade goodness. I thought this might be as good of a time as ever to share my first quilt story.


Fresh of my honeymoon in the fall of 2009 I came home to the best news of all, I was going to become an Aunt! I don't actually know what first put the idea of making a quilt in my mind, but whatever it was, that first tiny iota of a thought led me immediately to the Internet. I found a local quilt shop that offered an intro to quilting course and before I knew it I was signed up and heading to class.


I didn't know a thing about modern quilting, what fabrics to pick, or how to read a pattern, so on the guidance of the instructor I bought all my fabric from the remnant fat quarter section (doh!).

Knowing that it needed to be gender neutral I went with a natural colour pallet. I had originally wanted to do yellows, greens and blues but the instructor talked me out of it (something about jaundice babies looking bad on those colours - except the quilt I made is lap sized and meant to last years so why I listened I don't know!).


To make my very first quilt top, I used a Bento Box pattern and considering it was my first time sewing in almost 10 years, I was thrilled with how it turned out . Using a rotary cutter and self healing mat made for a very quick prep job, and simple chain piecing helped bring this quilt together very quickly.


 Since I had purchased only fat quarters to make this top, I didn't have quite enough fabric to make a borderless quilt that would meet my desired finish size. To solve the size dilemna, I added both a narrow and wide border to frame in the quilt top.


Since this quilt top had a lot going on, I tried to bring some cohesion by choosing one of the bento box fabrics for my backing. When I added the wide border to the quilt top, I simply choose the exact same fabric from the backing, but in a different colour.


I straight line quilted this top using a 24x8.5 inch ruler, a water soluable pen, and the bento box shapes as a guide. After I machine sewed the binding on I heaved a huge sigh of relief when I held the final product. This quilt had a lot of heart sewn into it and I was just the first step in what I know will be a life long obsession.

Friday 17 August 2012

From A - Going

I worked away on my Carnival quilt this week and managed to get almost all of the fabric cut and some of my blocks finished. Everything came to a screatching halt when I somehow managed to run out of white thread of all things.

After not being able to slip a trip to the fabric shop into this week, I've had to find another project to keep my hands occupied. Since we're going to spend weekend camping, it made sense that whatever I dug out of the old unfinished project bin be portable.

Enter this stitching project that I started a few months ago after seeing it in the December 2011 issue of Cross Stitcher magazine (love that magazine). I thought it would make a cute wall hanging in a child or baby's room.


I didn't think to take a picture of the pattern before leaving the house this morning but the finished product will be four animals walking in a line from biggest to smallest (a bear, a fox, a rabbit, and a squirrel). There is an empty area in the design where you can stitch in a child's name.

So far, the fox and rabbit are well under way. I'm hoping I can make some progress on the other two animals this weekend so I can get this ready for one of the three babies that are scheduled to arrive in October (I told you there were scads of babies this year!). We'll see how that pans out though since my heart is still back with my Carnival quilt.

Wednesday 15 August 2012

From K - Modern Rainbow Sequence Quilt

Being an aunt has to one of the greatest pleasures there is in life, and not just because you get all of the giggles and none of the diapers. I'm a pretty blessed auntie over here with two awesome nephews, and as of a few months ago, now a tiny little niece too!

The first two quilts I ever made were gifted to my nephews when they were born, and both were gender neutral because neither of my two sister-in-laws found out the sex of their baby ahead of time. As soon as I heard the news that my brother was expecting another baby, I decided I didn't want to be so gender neutral this time, so in preparation I made a boy quilt AND a girly quilt in advance.


Earlier this summer I became auntie to an adorable little girl, and I was so happy to gift her with this quilt. I took some pictures during my late night finishing session prior to her birth and I actually really like how the lighting plays up the stipple I used to finish it.


I knew that there were three main elements most important to me for this quilt. First and foremost I wanted it to be modern yet timeless, so I instantly thought of Kona Ash and some bright rainbow colours. Here is a picture of the quilt top in day light hours for those of you who weren't wooed by the romantic lighting in the previous picture ;)


I also knew that I wanted her to be able to grow with the quilt over time. I settled on a lap size of roughly 54" x 72" so down the line it can be used as a play mat, a picnic blanket or for movie night snuggle fests.


The third thing I wanted to do with this quilt is to create a simple and timeless backing, and what better timeless icon than stars! When I was making the wonky star blocks for this project, I referenced this tutorial by Elizabeth of Oh, Fransson!


Since I utilised a lot of neutral space in this quilt using a medium gray, I decided a scrappy rainbow binding would be a fun addition. The binding on this quilt wraps around following the colour order on the quilt top, starting at red and ending at white.


Final Quilt Details:
  • Quilt Name:  Modern Rainbow Sequence
  • Finished Size: lap size (54" x 72")
  • Fabric: Kona Cotton in Ash, 16 print from Bold and Beautiful (Bright) by Benartex
  • Pattern: my own design
  • Quilting: stipple
I had such a great time designing and creating this quilt. I think I might make more quilts in the future with this pattern concept in the mind. If you are interested in making a similar quilt using this pattern, leave a comment or email request asking for more information - I would be happy to obligue!

Monday 13 August 2012

From A - Two for One

I don't really stay abreast of the latest fabric lines. More often then not, I am late to the party after a line is released and I see what everyone else has done with the fabric. Such was not the case with Sweetwater's Lucy's Crab Shack line. As soon as I saw the whimsical name print, the kite strings, the vivid colours, the BICYCLES!!!, and the plaid I was a total goner! I immediately began stalking various on-line retailers anxiously awaiting its release.


Since I was on a bit of a fabric diet at the time, I ended up settling for a gorgeous layer cake and figured it would be enough to make two patterns that I've had my eye on while still leaving a few scraps for the stash: Jaybird Quilts' Carnival and Cluck Cluck Sew's Inside Out plus quilt. 


After spending a few hours yesterday carefully sorting the layer cake into two piles (one for each quilt), I started cutting for the blocks for Carnival using my lazy angle ruler.


I still have a few more fabrics to cut before I can start getting the background fabric cut. Hopefully by the end of the week, I'll be able to start piecing the blocks. For now, it's back to the cutting mat!

Saturday 11 August 2012

From A - Tacking, Nautically Speaking

After spending last weekend visiting family, playing with horses, and snuggling tiny little barn cats it was time to get back to work and back to life this week.


A few months ago I was pinning quilts made of half-square triangles (HSTs) almost exclusively.

I thought I worked this obsession with HSTs out I my system when I finished my Swoon quilt top. Turns out that although I made about a million quite a few of these little suckers during that project it only took the right stack of fabric and the ever looming pressure of finding another baby gift project to push me over the edge once again.

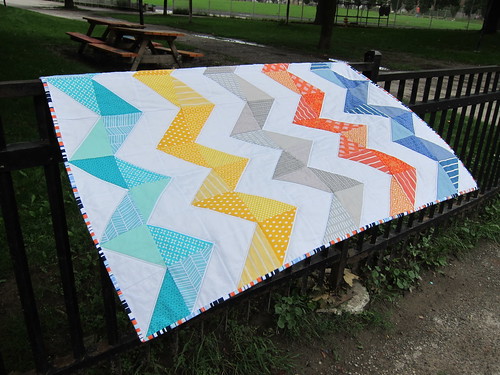
I've been eyeing up Cluck Cluck Sew's Ziggy Baby Quilt pattern since I really started getting back into quilting. I bought the pattern the first chance I got but it has taken me months to find just the right combination of fabrics before the ball got rolling.

I started with this bundle from Pink Castle Fabrics and swapped a few of the fabrics to add some nautical prints by Dear Stella and a few scraps from the stash.

Tacking - A Ziggy Baby Quilt

I keep reading people's rave reviews of Aurifil thread around the blogosphere and decided to see what all of the fuss was about. I found a sampler box of the Cotton Mako 50wt at a trade show and figured the colours would be good for top stitching and quilting.


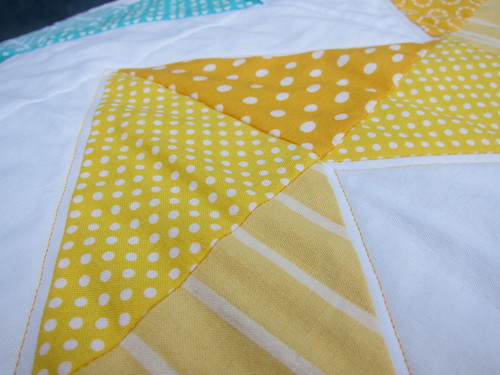
I matched the a spool of thread to each zig zag section and used my walking foot as a guide to quilt around the edge of each stripe.


I liked the Aurifil thread. It wasn't life changing but it was certainly smooth and shiny and made a nice finish of the quilting. At 1300 metres a spool, I have more than enough to play around with.

Tacking - A Ziggy Baby Quilt

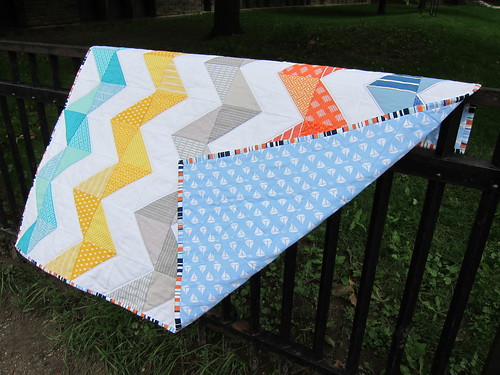
I used a simple sail boat print for the backing and since the quilt was narrower than the fabric, I didn't bother piecing a back together.

Tacking - A Ziggy Baby Quilta>

I'm really happy with how this quilt turned out. With the nautical flavour of these fabrics, I decided to name the quilt "Tacking" which is the sailing version of charting a zig zag course to sail against the wind. I thought it was appropriate given the difficult journey the intended recipient has had in trying to get pregnant.

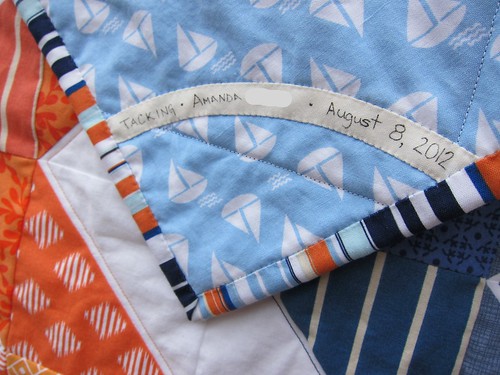
The label was made using the instructions I found here and I like the effect. It is visually interesting without being a focal point on the back of the quilt.

Tacking - A Ziggy Baby Quilt

I was lucky to find the striped fabric I used for the binding as it has almost all of the colours found in the quilt top and really ties everything together.

It feels great to get another project finished and another baby gift off the queue. Only 3 more projects to go until I there is a bit of a break in the baby arrival department. Now I only have to decide what to work on next!